Tool Mentor: Using RequisitePro to Baseline Requirements
Purpose
This tool mentor describes how to baseline the requirements using RequisitePro.
Related Rational Unified Process Activities:
Overview
This Tool Mentor is applicable when running Microsoft Windows 95/NT 4.0.
As a project goes through milestones, it is a good idea to capture the requirements state at each milestone. RequisitePro allows you to take a snapshot of your requirements project and store it into various configuration management tools such as Rational ClearCase, Microsoft®Visual Source Safe, Intersolv PVCS or simply as a RequisitePro archive, which makes a copy of the project into a directory.
To baseline the project requirements using RequisitePro, choose one of the following options:
- Archive a RequisitePro project as a RequisitePro archive
- Archive a RequisitePro project in ClearCase
- Archive a RequisitePro project in PVCS Version Manager
- Archive a RequisitePro project in Visual SourceSafe
A RequisitePro project consists of a requirements repository and a set of documents containing requirements. Requirements can be created either directly in the repository, or in a Microsoft® Word™ document. All documents containing requirements are referenced in the associated RequisitePro project maintaining these requirements.
A RequisitePro project archive contains all components of the project: the requirements repository, as well as all documents containing requirements.
1. Archive a RequisitePro project as a RequisitePro
archive 
Archiving a RequisitePro project as a RequisitePro archive simply makes a copy of all project files into a user defined directory. This option can be used to archive a RequisitePro project to a configuration management systems not directly supported by RequisitePro. In that case, any configuration management systems can be used to check in and out the archived directory content.
To baseline a RequisitePro project as a RequisitePro archive, follow these steps:
- From the RequisitePro’s Tool Palette, select Project=>Archive.
- Select RequisitePro Archive menu item. The Archive Project dialog is displayed.
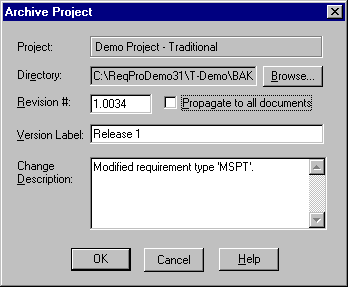
- Click on the Browse… button to select the archive directory.
- To later access this archive, simply add the project located in the archive directory to the RequisitePro catalog:
- Select Project=>Catalog from the Tool Palette
- Select the project located in the specified archive directory and click Add…. The archived project is now available from RequisitePro.
2. Archive a RequisitePro project in ClearCase
You can archive a RequisitePro project into ClearCase for NT 4.0. When a project is added to ClearCase, ClearCase copies the project to the VOB and changes the RequisitePro catalog to reference the project as part of a ClearCase view. The RequisitePro project lives in the file system and is no longer accessible in its previous location in RequisitePro. The location where the project is archived should be a ClearlCase shared view, so that all users have accessed, provided they have the correct RequisitePro access permissions, to the project components (documents and project). To archive a RequisitePro project in ClearCase, follow these steps:
- In Microsoft®Explorer, create a View of the ClearCase VOB to be used, and mount the view (say R:).
- Specify the ClearCase VOB location in the reqpro.ini file
- From the RequisitePro’s Tool Palette, select Project=>Archive=>ClearCase. The ClearCase dialog is displayed.

- The first time you archive your RequisitePro project, click on Add Project… to add your project to the set of projects archived under ClearCase. The Add Project to ClearCase dialog displayed projects cataloged in RequisitePro.
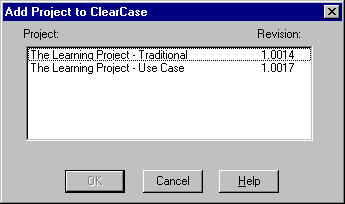
- Select your project and click OK to dismiss the dialog.
- In the ClearCase main dialog, select CheckIn Project. The Check in to ClearCase dialog is displayed.

- Set parameters values and click Close on the ClearCase dialog.
3. Archive a RequisitePro project in PVCS Archive Manager
This checks a RequisitePro project into PVCS Version Manager. Similarly to the ClearCase integration, the complete RequisitePro project is checked in and out of the PVCS archive.
- Select the destination directory for RequisitePro project archives. PVCS does not have a central database where it stores its archives. They can be stored on any directory in the file system. The RequisitePro integration uses a setting in the reqpro.ini file to locate the root directory of established as the location for all RequisitePro project archives. Each project that is added to PVCS is placed in a separate sub-directory from this root directory. For multiple users to share the same archive location, they must have the same INI file setting.
- Specify the PVCS archive location in the reqpro.ini file
- From the RequisitePro’s Tool Palette, select Project=>Archive=> PVCS Version Manager. The Archive Project dialog is displayed.
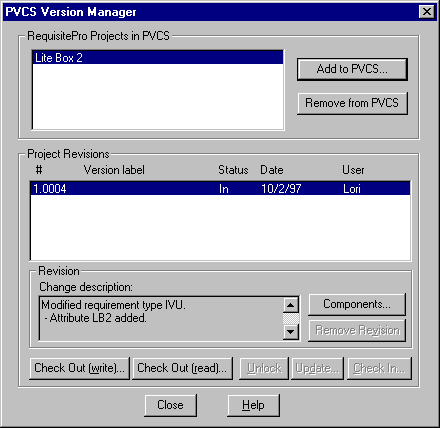
- The first time the project is archived, you need to add it to PVCS Version Manager. Once the project has been created in PVCS, the RequisitePro project (including all documents belonging to the project) will be added to the PVCS project as a new file. To add a RequisitePro project to PVCS, click on the Add to PVCS button. The Add Project to PVCS Version Manager dialog displayed all projects currently cataloged in the RequisitePro catalog. Select your project and click OK.
- Once your project is added to PVCS, from the PVCS Version Manager main dialog, click on the Check In button.
- Click OK. PVCS Version Manager removes the project from your catalog and stores it in the PVCS archive.
4. Archive a RequisitePro project in Visual Source Safe
This checks a RequisitePro project into Microsoft®Visual Source Safe.
- From the RequisitePro’s Tool Palette, select Project=>Archive=>Visual SourceSafe (VSS). The Visual SourceSafe Login dialog is displayed.
- Enter your VSS Username and Password, and the location of the SRCSAFE.INI file (this file is the INI file in the root directory of your VSS database). Click OK. The Visual SourceSafe main dialog is displayed.
- The first time the project is archived, you need to add it to VSS. Once the project has been created in VSS, the RequisitePro project (including all documents belonging to the project) will be added to the VSS project as a new file. To add a RequisitePro project to VSS, click on the Add Project button. The Add Project dialog displayed all projects currently cataloged in the RequisitePro catalog, but not checked into VSS. Select your project and click OK to dismiss the dialog. If security is enabled on the RequisitePro project, you will be prompted to login before the project is added to VSS.
- The Check In dialog is displayed. The VSS project revision number for the checked in project displays in the VSS Version text box.
- The RequisitePro revision number displays in the Revision# text box. Click OK. VSS removes the project from your catalog and stores it in the VSS archive.
![]()