Tool Mentor: Using RequisitePro to Find Actors and Use Cases
Purpose
This tool mentor describes how to use Rational RequisitePro to record the results of finding actors and use cases.
Related Rational Unified Process activities:
Overview
This Tool Mentor is applicable when running Microsoft Windows 95/NT 4.0.
To record the results of finding actors and use cases using RequisitePro (note that this activity can be performed in either Rational Rose or Rational RequisitePro:
- Document actors
- Document use cases
- Establish traceability links between actors and use cases
- Record supplemental requirements
- Transfer use case requirements to a Rational Rose project
1. Document Actors 
For each actor you create an actor requirement in the RequisitePro database. Even though RequisitePro is a requirements management tool, its architecture allows users to store any information that is related with requirements. For instance, actors are helpful to delineate the system boundaries, and therefore represent system interfaces to the external world. Documenting actors has the advantage of defining interfaces to the system for which we gather requirements. You document actors in RequisitePro and set traceability links between actors and the use cases with which they interact.
Each actor’s representation in RequisitePro contains the actor’s name, a brief description of the actor’s responsibility including what the actor needs from or provides to the system. Each actor is defined as a requirement of type ACTOR. To create an actor requirement, follow these steps:
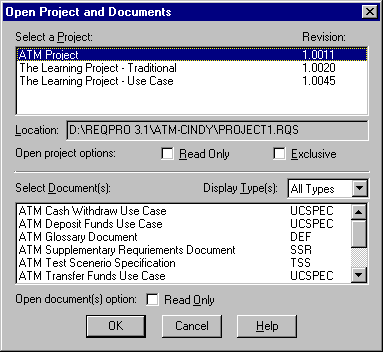
- In RequisitePro, select Project=>Open from the Tool Palette
- In the "Open Project and Documents" dialog, select your project.
- Click "Switch to the Views workplace" on the RequisitePro’s Tool Palette.
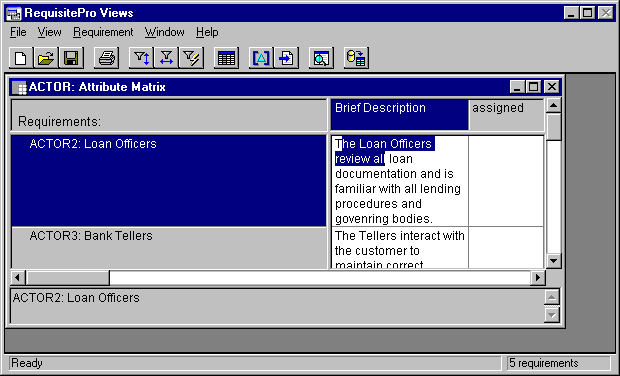
- From the Views, select File=>Open View and choose the view labeled "ACTOR: Actors List"
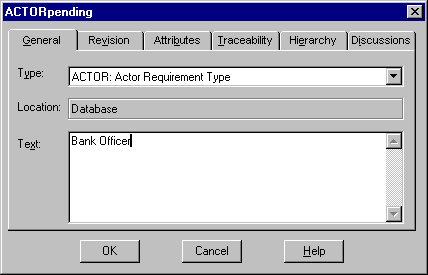
- When the view is displayed, select Requirement=>Create from the Views menu. The Requirement dialog is displayed.
- Enter the actor name in the Text field and select ACTOR as the requirement type. Click OK to dismiss the dialog.
- Back in the view, enter the actor brief description text in the Brief Description column.
Since information pertaining to actors is usually limited to a name and a brief description, actors are entered directly into the RequisitePro repository, as database-based requirements (as opposed to document-based requirements). In RequisitePro, requirements can be originated two ways:
- in a Word document (these are document-based requirements),
- directly entered in the requirements repository (these are database-based requirements),
You typically use document-based requirements when users would like to read the requirement within some context. Word allows you to add informational text around the requirement itself. Requirements that do not need context information to be understood clearly can be created as database-based requirements, directly from the Views workplace.
If you need to publish an actor document, you can use the File=>Export to Word option from the Views menu. For readability, you might consider enlarging the height of the rows in the ACTOR attribute view, by dragging the row separators. This ensures that the brief description of actors is appropriately displayed in the created Word table. Alternatively, Rational SoDA can be used to create a more sophisticated report with some predefined text.
2. Document Use Cases
Use case UML modeling elements may be entered in RequisitePro in a similar way to actors. Before detailing use cases, you will typically enter all use cases with a brief description for each, then prioritize and select which use cases you indeed plan to implement in each development iteration. Only these identified use cases will be detailed in Detail a Use Case.
- Click on the "Switch to the views workplace" icon on the RequisitePro’s Tool Palette.
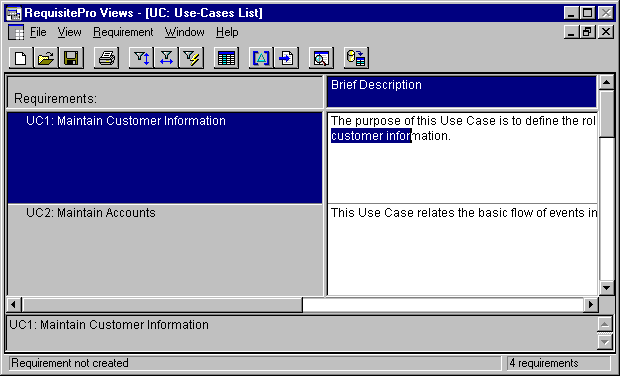
- Select File=>Open View and choose the view labeled "UC:Use-Cases List"
- From the view, select Requirement=>Create from the Views menu. The Requirement dialog is displayed.
- Enter the use case name in the Text field and select UC as the requirement type. Click OK to dismiss the dialog.
- Back in the view, enter the use case brief description text in the Brief Description column. Optionally set the Priority attribute.
- Set the Planned Iteration attribute to the iteration number (1,...n) where this particular use case will be realized Notice the Actual Iteration attribute that you should later fill to indicate the iteration in which this use case was indeed realized. The difference between the Planned Iteration and the Actual Iteration value will be indicative on how much on track the project is, and whether you need to re-estimate later iterations based on the early knowledge you gain from this comparison.
- Set the "Affects Architecture" attribute to True or False to indicate whether this use case is part of the earlier architectural iterations, or not.
3. Establish Traceability Links Between
Actors and Use Cases
Each use case is typically initiated by an actor and may also interact with other actors, as shown by the communicates-association in a UML diagram. The relationships between actors and use cases help identify and define the system interfaces to the external world. We will set a traceability link between each use case and actor which have such an association, in order to help track the impact of any changes to either which will be shown by suspect links in RequisitePro. To set traceability links between actors and use cases, follow these steps:
- Click on "Switch to the views workplace" on the RequisitePro’s Tool Palette.
- Select File=>Open View and choose the view labeled "ACTOR-UC:Actors/Use-Cases Associations".
- In the displayed traceability matrix view, position the cursor at the intersection of the ACTOR requirement and the UC requirement representing each ACTOR-UC interaction.
- Right click on intersecting cell and select Trace To from the pop-up menu.
- Repeat steps 3-5 above for each applicable ACTOR–UC association.
4. Record Supplemental Requirements
You will often discover requirements that are not attributed to any specific use case. Some non-functional requirements that apply to the whole system, business rules and design constraints that developers need to know about. These should all be recorded in the Supplementary Specifications document.
To create a Supplementary Specifications document, follow these steps:
- From the RequisitePro’s Tool Palette, select Document=>New. The Document dialog is displayed.
- In the field Name, enter "Supplementary Specifications" (this will be the way you refer to the Supplementary Specifications document in RequisitePro).
- Enter a short description such as "The Supplementary Specification captures the system requirements that are directly associated with any specific use cases" in the Description field.
- Enter a filename (RequisitePro will use this filename when saving the Supplementary Specification to disk).
- Select the "Supplementary Specification Document Type" outline as the Document Type.
- RequisitePro will then bring up MS Word and open the newly created Supplementary Specification.
- Fill in the document with the appropriate requirement information.
Once the descriptive text for each requirement is entered, follow these steps:
- Select the text for each such requirement then select the "Create Requirement from highlighted text" icon from the RequisitePro’s Tool Palette to make it a RequisitePro requirement.
- On the General tab of the Requirement Properties Dialog, select the Supplementary Requirement Type, and optionally assign some attribute values (such as priority, risk, etc). Click OK to exit the dialog.
- Select Document=>Save to commit your work to the RequisitePro database. (note that none of your new requirements are actually committed to the database until you save the document).
5. Transfer Requirements to a Rational Rose Project
If you are using Rational Rose to develop your Use-Case Model and your Design Model, you may transfer the use-case requirements to the Rose project to perform use case analysis and design.
To create the use case and actor elements in the Rational Rose model:
- Select Tools=>Rational Synchronizer from the RequisitePro Tool Palette. The Rational Synchronizer Wizard appears. The first screen is a welcome message. Press Next.
- You only want to create the Rational Rose items corresponding to the RequisitePro use case and actor requirements so you select "Update a subset of items" in the Wizard and press Next.
- The next screen shows the projects you can synchronize with. Select the appropriate Rational Rose model and press Next.
- The next screen presents synchronization options. Select Receive and press Next.
- The next screen summarizes your choices. Make sure that it says that you have chosen to receive changes made to some items and press Finish.
- The next window shows all of the items in the Rose project that will be updated and created. If you have made no other changes to the projects other than finding actors and use cases in RequisitePro, all of the items should have the Action column say Create and the Application say Rose. If this is not the case you need to analyze whether to cause the rules other than creating Rational Rose items to be executed. Select all of the actions you want to occur and press the "Commit Selected Actions" button or menu selection. The rules are executed, the items are created in the Rational Rose model.
- Exit the Rational Synchronizer.
![]()