Tool Mentor: Using RequisitePro to Detail a Use Case
Purpose
This tool mentor describes how to use Rational RequisitePro to describe a use case in detail, whether business or system use case. For business use cases, the worker is the Business-Process Analyst, while for system use cases, the worker is the System Analyst.
These steps are analogous for system as well business use cases.
Related Rational Unified Process Activities:
Overview
This Tool Mentor is applicable when running Microsoft Windows 95/NT 4.0.
To detail a use case using RequisitePro:
- Create a Use-Case Specification document
- Complete the Use-Case Specification document
- Mark requirements in the detailed Use-Case Specification
- Set traceability to use case requirements identified in Activity: Find Use Cases and Actors
- Add diagrams to the Use-Case Specification (optional)
Once the set of use cases identified for the system to be built has been recorded in Activity: Find Actors and Use Cases, these use cases are prioritized to select which ones will be implemented. Use cases are not detailed until they are selected for implementation.
The Use Case Specifier writes a Use-Case Specification document for each use case to implement. The Use-Case Specification document defines all textual properties of the use case, and may elaborate on the name and the brief description of the use case produced in the Rational Unified Process Activity: Find Actors and Use Cases and Activity: Find Business Actors and Use Cases
1. Create a Use-Case Specification Document 
The Use-Case Specification document will contain the use case’s textual properties:
- name,
- brief description,
- basic flow of events,
- alternate flow of events,
- preconditions,
- postconditions,
- special requirements.
From the RequisitePro’s Tool Palette, select Document=>New. The Document dialog comes up. Enter the parameters as shown in the picture:
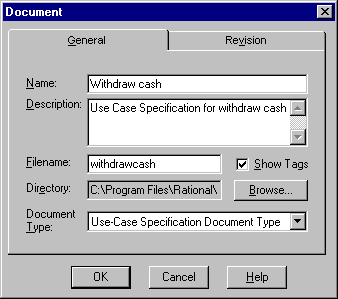
- In the Name field, enter the name of the use case (this will be the way you refer to the Use-Case Specification in RequisitePro).
- In the Description field, enter some descriptive text for a use-case specification. Note that this short description will not be used as the use case brief description, so simply use a sentence to differentiate use cases.
- In the Filename field, enter a filename (RequisitePro will use this filename when saving the Use-Case Specification to disk).
- Select the "Use-Case Specification Document Type" as the Document Type. The template for this document type organizes the use case properties into property-specific sections (name, brief description, flow of events, etc…). RequisitePro will open the newly created Use-Case Specification document in its Word workplace.
2. Complete the Use-Case Specification
In the newly created Use-Case Specification document, we will complete each section with the use case specific information. The name and the brief description properties should already have been documented in the Find Use Cases and Actors activity, either starting with RequisitePro or Rational Roseä , therefore we will copy the brief description information from the existing use case requirements.
Once the Use-Case Specification document is the active Word document:
- Replace the "use case name" text displayed in the template by the use case name.
- After reading instructions in the Brief Description field provided as default text, delete the provided instructions and copy the brief description information already entered in the Find Use Cases and Actors activity:
- On the RequisitePro’s Tool Palette, click on the "Switch to views workplace" icon.
- Create a use case attribute matrix of the use cases documented in Find Use Cases and Actors: Click on the "Create a new view" icon, select "Attribute Matrix" and the UC requirement type.
- Once the attribute matrix is displayed, click in the Brief Description attribute column and select the brief description text by clicking on the left of the first character and dragging the selection until the last character of the brief description is highlighted.
- Hit Ctrl-Ins to copy the selected text. [Note: This is a non-standard Windows copy procedure! Using Ctrl-C will not work to copy this field.]
- Bring forward the Use-Case Specification document. Select Window=>Active from the RequisitePro’s Tool Palette, and choose the name of the Use-Case Specification from the list of opened documents.
- Position the cursor in the Brief Description section of the document and hit Shift-Ins to paste the brief description text. [Note: This is a non-standard Windows paste procedure! Using Ctrl-V will not work to paste this field.]
- Replace the text located in the Basic Flow of Events section with the text for this use case’s basic flow of events. For flow of events, use a step-by-step description, whereby each step is identified on its own line.
- Repeat the step above for the other use-case properties (alternate flow of events, special requirements, preconditions, postconditions, etc…).
- Save the Use-Case Specification document by selecting Document=>Save on the RequisitePro’s Tool Palette.

3. Mark Requirements in the Detailed Use Case
Specification
In order to track traceability links between use-case information and other information, such as product features or test cases, we will create RequisitePro requirements in the various Use-Case Specification sections. You do not need to create requirements in each section of the Use-Case Specification. The value of creating requirements is to later being able to trace a higher level requirement, such as a product feature, to a specific part of the use case detailed description. To that extent, we recommend identifying as few requirements as possible (to reduce the amount of work) to feel confident that all higher level requirements (committed with the customer) are traced somehow into the detailed specifications.
Since all properties of a use case belong to that use case, we will use hierarchical requirements and mark the use case name as a parent requirement and its properties as child requirements.
- For the use case name:
- In the Word workplace, select the text representing the use-case name and click on the Create Requirement from highlighted text icon on the RequisitePro’s Tool Palette.
- In the Requirement dialog, select UCSEC (use case section) as the requirement type.
- Go to the Attributes tab and set the Property attribute to "Name" from the drop-down list of use-case properties.
- For the use case brief description:
- Repeat the three steps above for the brief description (setting the Property attribute to "Brief Description").
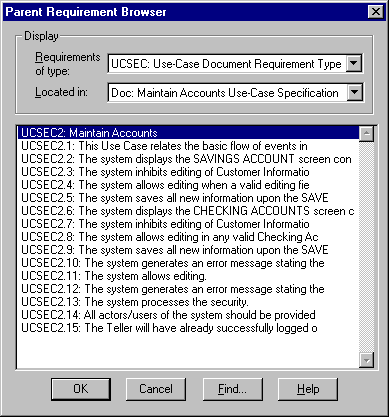
- Additionally in the Requirement dialog, click on the Hierarchy tab, select <choose parent>. The Parent Requirement Browser is displayed. Identify the UCSEC requirement representing the use case name. Click OK.
- For the use case basic flow of events
- create UCSEC requirements for each step or group of steps (subflow) to which you wish to set traceability links.
- Set the Property attribute to "Basic Flow".
- Set the requirement’s parent to the requirement created from the use case name.
- Optionally indicate groups of steps which are always performed together. If necessary, use hierarchical requirements to distinguish subflows from the main basic flow of events. For example, you might also consider creating a requirement from the "Basic Flow" heading, even though that heading is not a requirement per se. This will allow later tracing of specific product features to the basic flow of events as a whole. This suggestion most applicable for use cases with short basic flows.
- For the Use case alternate flows:
- In each alternate flow of events, create UCSEC requirements for each step or group of steps (subflow) to which you wish to set traceability links.
- Set the Property attribute to "Alternate Flow".
- Set the requirement’s parent to the requirement created from the use case name.
- Similarly to the basic flow of events, use hierarchical requirements to indicate complete subflows.
- For use case preconditions:
- In the preconditions section, if you choose to identify requirements, select each precondition separately.
- Create a UCSEC requirement.
- Set the Property attribute to "Preconditions".
- Set the requirement’s parent to the requirement created from the use case name.
- For use case postconditions:
- In the postconditions section, if you choose to identify requirements, select each precondition separately.
- Create a UCSEC requirement.
- Set the Property attribute to "Postconditions".
- Set the requirement’s parent to the requirement created from the use case name.
- For Use case special requirements:
- In the Special Requirements section, if you choose to identify requirements, select each precondition separately.
- Create a UCSEC requirement.
- Set the Property attribute to "Special Requirement".
- Set the requirement’s parent to the requirement created from the use case name.
Important note for all flow of events: just like you do not need to create requirements for every section of the Use-Case Specification, you do not need to create requirements for each step in a flow of events. The value of creating flow of events requirements is to later being able to trace a higher level requirement, say a product feature, to a specific part of the flow of events. This may be preferable to considering the flow of events as a whole since flow of events often span several pages.
4. Set Traceability to Use-Case Requirements
Identified in Activity: Find Actors and Use Cases
You might wonder why there are two requirement types associated with each use case:
- the UC requirement type,
- the UCSEC requirement type.
The UC requirement represents the UML modeling element (use case), which can be synchronized with Rose for visual modeling, ensuring that if use cases are modified in Rose, these changes are reflected in RequisitePro. During the earlier phases, it is likely that use case names and brief descriptions will be modified iteratively either in Rose or in RequisitePro. The UC requirement represents a proxy of the use case UML modeling element defined in Rational Roseä . The Rational Synchronizer’s role is to maintain the consistency in use case names and brief descriptions between Rose and RequisitePro. The use case modeling element is created by the System Analyst or the Business Analyst.
On the other hand, the UCSEC requirements define the detailed use-case properties described in the Use-Case Specification. UCSEC requirements for a use case are only created once a use case has been identified as candidate for the current software iteration. UCSEC requirements are solely maintained in the requirements management tool, RequisitePro. The Use-Case Specification is created by the Use-Case Specifier.
A project will typically have more UC requirements than matching parent UCSEC requirements, as you will likely elicit more use cases than you will indeed implement.
To maintain traceability between the use-case modeling elements and their detailed description identified in each Use-Case Specification, we need to establish a traceability link between the two. Not all use cases identified in the Find Use Cases and Actors activity need to be detailed. The use cases that we chose to detail are the ones prioritized and identified as primary use cases.
Linking the use-case requirements to their detailed use-case requirements allows users to be notified, via suspect links when the original use cases are revised in Rational Rose or RequisitePro, and possibly changes to their names and/or brief descriptions may impact development. Conversely, if the Use-Case Specifier changes the use case details in the Use-Case Specification, RequisitePro will indicate that the matching use case UML modeling element may need to be updated.
To create a traceability link between each use case UML modeling element and its matching UCSEC requirement, follow these steps:
- Click on the "Switch to the views workplace" icon on the RequisitePro’s Tool Palette.
- Create a traceability view by clicking on the "Create a new view" icon, selecting "Traceability Matrix", selecting UC for the row requirement type and UCSEC for the column requirement type.
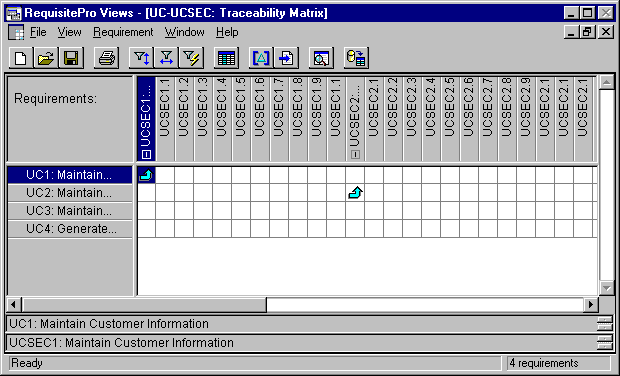
- Position the cursor at the intersection of the UC requirement and the matching UCSEC parent requirement (the UCSEC requirement with Property attribute set to "Name").
- Right click on the intersecting cell and select Trace To from the pop-up menu.
- Repeat the two previous steps for each pair of use case UML modeling element and its matching UCSEC parent requirement.
5. Adding Diagrams to the Use Case Specification
(optional)
Some of the use-case properties are non-textual, such as "use case diagrams" and "other diagrams". See the Artifact: Use Case. These non-textual properties are stored in Rational Roseä . If needed, you can create a full (textual and non-textual properties) description of a use case. Rational SoDA, allows you to create a Use Case Report from the use-case textual properties stored in RequisitePro and the use-case non-textual properties stored in Rational Roseä . See Report:Use-Case Report on how to create this report. You may also use the OLE technology available in MS Word to embed diagrams into the RequisitePro Use-Case Specification document, if you wish to view use-case diagrams in RequisitePro.
![]()