Organizing and Managing Software Projects Using ClearCase on Windows |
Introduction
Purpose
This paper provides guidance for a ClearCase implementation for component-based development. The primary focus is on using ClearCase during the construction phase of a project. The construction phase begins after the project requirements have been gathered and a system architecture has been defined.
This document recommends one way of successfully organizing and managing component-based software development using ClearCase. It is not the only way to achieve success with ClearCase. It is up to you, working with your customer, to determine if the approach described here is a good fit. This paper discusses some of the situations that may lead you to recommend a modified or different approach.
The implementation details in this paper assume you are in a Windows NT development environment using ClearCase 3.2 with view profiles. The ClearCase concepts are identical across platforms but the implementation details vary. A separate document will address UNIX and mixed environments.
Audience
If you have general knowledge about the software engineering process and you are interested in configuration management, you can benefit from reading this paper. If you plan to implement the recommendations made in this paper, you need to start with at least a basic understanding of ClearCase, for example, the level of understanding you would acquire in the ClearCase Fundamentals course.
Organization
This paper is organized as follows:
- Introduction (this section) introduces the paper and identifies the audience.
- Conceptual Overview lays the conceptual groundwork for the configuration management process described in the remainder of the paper. This section describes the workflow and the types of configuration items.
- Establishing the Initial CM Environment describes how to set up a configuration management (CM) environment at the start of a project. It describes how to use the system architecture as a basis for the structure of the CM environment. It also suggests a directory structure.
- Managing a Software Project in a ClearCase Environment describes how to use ClearCase to manage a CM environment for projects. It describes how developers typically interact with ClearCase. It also discusses two approaches to promotion.
- Referencing Subsystems between Projects discusses how to share subsystems among multiple project teams.
- Advanced Topics briefly describes working in a more complex environment.
- Appendix A, Glossary defines common CM terminology, and where appropriate, describes the mapping to ClearCase terminology.
- Appendix B, References lists additional reading referenced throughout this paper.
- Appendix C, Process Support provides the code for a trigger which supports the configuration management model described in this paper.
Conceptual Overview
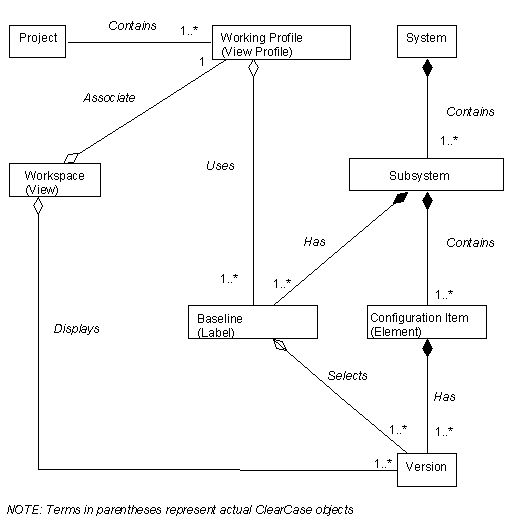
This section provides an overview of configuration management as part of a software development project. Subsequent sections both elaborate on the material in this section and provide implementation details. The responsible people and their activities are illustrated in Figure 1. The structural relationship of configuration items is shown in Figure 2.
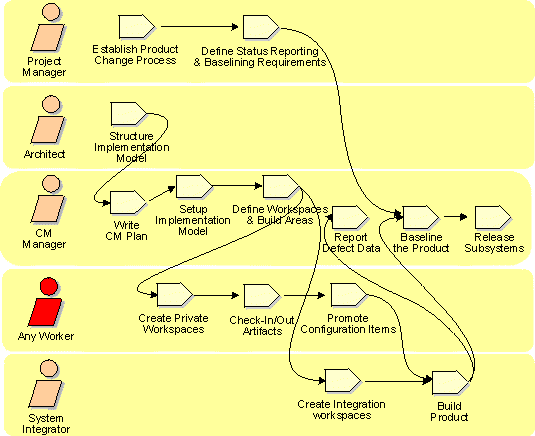
Figure 1. Process Overview
Preparing for the Construction Phase
Typically, software development requirements and budgets are established at project
inception and evolve during elaboration. The project architect uses the requirements to
create a system architecture or to modify an existing architecture. The system
architecture serves as a logical framework to satisfy the requirements. Models represent
the system architecture, providing different views1 of the system. Of these
views, the most important for CM is the implementation view. The implementation view maps
logical system packages to the physical files and directories that will be placed under
version control.
1
The term view as used here is a Rational Unified Process term which refers to an abstraction of a system architecture. This abstraction is seen from a given perspective or vantage point and omits entities that are not relevant to this perspective. This single use of view is not related to the ClearCase view object. Elsewhere in this paper, any mention of the term view refers to a ClearCase view.Defining Subsystems
A subsystem is a group of files and directories that implement one or more logical packages. These files and directories are versioned, shared, and released as a single unit. A large system typically consists of many subsystems. A small system may be contained by only one subsystem if that system is the only piece that is versioned, shared, and released as a whole.
Creating Repositories
At project startup, the CM administrator establishes the CM environment for the project. This involves creating the project’s first CM repository, the system repository. Project members should place requirement documents and system models under version control in the system repository.
Before implementation begins, the project leader and CM Administrator establish the development CM environment for the project as follows:
- They conceptually map the system architecture to subsystems.
- They map these subsystems to CM repositories.
- The CM Administrator creates the CM repositories and establishes the project directory structure.
- The CM Administrator or another project member imports existing files and directories into the repository to create an initial set of development configuration items.
Before implementation begins, the project leader defines workspace profiles for the project engineering team. A workspace profile defines:
- Which subsystems make up the working set for the project. A working set is the list of subsystems which must be referenced or modified to do a piece of work. This list may or may not be the entire system.
- The specific versions of these subsystems that can be modified or referenced.
The project leader defines which subsystem baselines the team will start working on. A baseline defines one version of a subsystem, usually a version that represents a project milestone. A baseline is formed by identifying exactly one version of all configuration items that comprise the subsystem. Configuration items are the physical artifacts which are placed under version control. The project leader also defines the integration workspace, which is the area into which individual developers will promote their work.
Development Work
Each developer creates a private workspace which is isolated from the workspaces of other team members. A workspace provides a place for a developer to make changes to the system without seeing or affecting other developers’ changes. The workspace configuration is defined by associating it with one of the workspace profiles that the project leader defined (see Defining Working Configurations). A developer who is done with a piece of work can promote changes to the project’s integration workspace. The developer can also update their own workspace to see changes that other developers have promoted into the project integration workspace.
Integrating and Building
The project integrator use two workspaces, the integration workspace and the build workspace, to integrate changes, perform builds, and create project baselines:
- The integration workspace is used to select a fixed set of versions that have been promoted and to identify candidate build versions.
- The build workspace is used to perform the build itself.
After building and testing, the integrator creates baselines for subsystems. As part of creating a baseline, the integrator assigns an identifier to every development configuration item in that subsystem and other referenced subsystems. Later, a team member can use that identifier to rebuild, release, or refer to a subsystem or system.
Releasing a Subsystem
The configuration manager places all product deliverables under version control. The product deliverables may reside in one of the development repositories or may reside in a separate repository reserved for deliverables. These configuration items are also associated with a baseline. Other development teams can select and share deliverable or source configuration items by referring to the baseline.
Process Iterations
The development process described in this section is iterative in the following ways:
- The cycle of making a change, promoting the change, building, creating a baseline, and updating the view represents on-going development.
- The cycle of making a change, promoting the change, building, creating a baseline, and releasing the software represents iterative releases. It also represents the cycle of sharing between project teams working on different subsystems and contributing to a common system release.
Establishing the Initial CM Environment
This section describes how to set up a configuration management environment. It discusses establishing repositories, mapping the system architecture to subsystems, and mapping subsystems to a development directory structure.
Creating the Initial System Repository
During early phases of a project, project members create artifacts which should be placed under version control. (When you plan an item under version control, it becomes a configuration item.) For example, configuration items include RequisitePro documents that describe the system requirements, and Rose model files that describe the system architecture.
We assume that you have created a CM system repository to contain the configuration items for those artifacts produced at the beginning of any project. In ClearCase, a CM repository is called a VOB (versioned object base). For more details about creating VOBs, see Creating the CM Repositories. See Defining the Product Directory Structure for suggestions about directory naming.
Mapping the Architecture to Subsystems
Using traditional structural software design methods, you typically decompose a system into a set of high-level functions which you in turn decompose into sub-functions. By contrast, when you use object-oriented design methods and the UML in particular, you typically decompose a system by grouping modeling elements (typically classes) into packages.
From a CM perspective, you also decompose systems into subsystems. A subsystem encompasses a group of physical files and directories which are versioned, shared, and released together. Structurally, CM subsystems are not decomposed further. They may however contain more than one package. So when you map the architecture to subsystems, you begin with the logical decomposition of the system directly into packages. You then assign one or more of those packages to subsystems.
If you are developing a component-based system, you should place each of its pieces (each of the components) under separate version control. A component has a well-defined interface and can be used to compose larger components or systems. Each subsystem represents one or more components and may include other configuration items. You create a version of the entire system by selecting one baseline for each of its subsystems.
Using a component-based development approach has these benefits:
- You can build, test, and release subsystems separately, reducing system complexity.
- You can develop iteratively, which is especially helpful in an environment with overlapping releases.
- Groups can share subsystems. Teams can share stable versions of subsystems with other project teams and avoid the problems of working with unstable code.
- Development teams can be organized by subsystem. Depending upon the size of the team and the system being developed, the team can be further organized so that developers are assigned to one or more components in a single subsystem. The goal is to have a minimum number of developers working in the same space. This technique isolates development work, reducing parallel development issues. Packages and subsystems provide the framework for this.
If you are managing a small project (15 developers or fewer) you may choose to create a baseline for the entire project. In other words, you checkpoint and release the entire system as a unit rather than as a collection of independent subsystems. In this case you should put all of the logical packages into a single subsystem. (See Mapping the Architecture to Subsystems for more information.)
For larger projects, you typically create a baseline for each subsystem separately. You then assemble a system by selecting baselines (versions) of each subsystem.
Example
This section describes an example system, Thorn 2000. It presents different ways to decompose an architecture into subsystems depending on the size and complexity of the system and the size of the development team. The architecture for Thorn 2000 is shown in Figure 3:
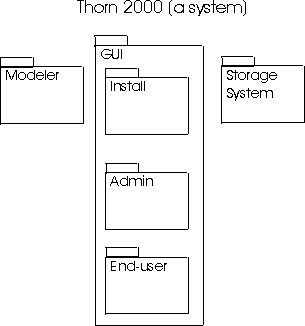
Figure 3. Architecture of a typical system.
SCENARIO 1 – A small project
The first release of the Thorn 2000 system will take 10 developers 6 months to complete.
In this scenario, the project manager decides to organize the work as a single project with all 10 development members located in the same facility. The small team works together to create a single subsystem, containing all of the logical packages, for the entire Thorn 2000 system. The packages themselves may be allocated to specific project members, but Configuration Management is performed on the system as a whole.
SCENARIO 2 – A medium project
The first release of the Thorn 2000 system will take 30 developers 18 months to complete.
In this scenario, the project manager divides the developers into three project teams:
- A team of 8 developers is responsible for all the graphic user interfaces.
- A team of 10 developers is responsible for the modeler.
- A team of 12 developers is responsible for the storage facilities.
The project manager chooses to break the system architecture into three subsystems that map to the high-level system packages: the Modeler subsystem, the Storage subsystem, and the GUI subsystem. Note that the interfaces between the logical packages must be clearly defined and enforced during development in order to take full advantage of the subsystem decomposition.
System integration is performed by selecting the appropriate baseline for each of these subsystems.
SCENARIO 3 – A large and complex project
The first release of the Thorn 2000 system will take 120 developers 18 months to complete.
In this scenario, the administrative piece of the GUI will be developed by 20 developers who are not located at the primary facility. The project manager decides that there should be more detailed subsystem decomposition than the high-level package breakdown and breaks the system architecture into five subsystems: the Modeler subsystem, the Storage subsystem, the Admin GUI subsystem, the User GUI subsystem, and the Installation GUI subsystem.
Once you decompose the subsystems for CM purposes, you should consider each subsystem as a distinct unit that you can build and test independently. You will need to define and enforce interfaces among the logical packages and therefore among the subsystems.
Mapping Subsystems to CM Repositories
Recall that in ClearCase, the CM repository is called a VOB (versioned object base). Once a VOB is created, it is available to all the machines on the network that participate in your project. Initially, you may have one system VOB that contains project configuration items such as requirement documents or system models.
We recommend that when you map subsystems to CM repositories, you assign each subsystem to a separate ClearCase VOB. If your project has more than one subsystem, create one VOB per subsystem, in addition to the system repository. For very small projects you may create only one subsystem for your project as mentioned in Defining Subsystems. In this case you can also use the original system repository to store configuration items for the subsystem. As a result, you store all system and project data in one single VOB.
How Many VOBs Do You Need?
In ClearCase terminology, configuration items are called elements. An element is a file or directory that is under version control. So a subsystem is composed of a set of ClearCase elements. We recommend that you assign each subsystem to a separate VOB. However, you also need to consider the number of elements stored in any one VOB when determining how many VOBs you need. Consider the following questions:
- How many subsystems are in your project?
As discussed earlier, you should store each subsystem in a separate VOB.
- How many elements are stored in any single VOB? (How many files make up the subsystem)?
How many concurrent users will access the elements in a VOB? (How many users need concurrent access to a particular subsystem)?
ClearCase does not impose a limit on the number of VOB elements you can create or on the number of concurrent users accessing a VOB. For optimal performance however, Rational makes the following recommendations. In general, for a VOB hosted on a machine configured as a minimal VOB server, allow for up to 20 concurrent users and 2500 source elements. Factors such as faster machines, more memory, and fewer concurrent users allow the VOB to hold more elements. As a general rule, VOBs which are not referenced during software builds (VOBs which store project documentation or models) can contain more elements and can handle more concurrent users. For more information, see Selecting a VOB Host in the ClearCase Administrator’s Manual.
If a VOB grows too big, you can split it by using the cleartool relocate subcommand. Subsystems which contain more than 2500 elements are good candidates for splitting into more than one subsystem. However, it may not be possible to split a VOB because of interfaces between subsystems.
This document does not address the details of how to manage a single subsystem which spans multiple VOBs. If a subsystem does span multiple VOBs, make sure you use identical labeling and configuration specifications for the entire subsystem.
- Does a geographically distant site need access to a subsystem?
Store any subsystems that will be developed at different sites in a separate VOB. These subsystems deserve special consideration even if the project is small. Dividing work along subsystem boundaries is critical for the success of a multiple-site project.
Note: In general, try to minimize the number of VOBs you create. Each VOB requires additional administrative overhead.
Creating the CM Repositories
The CM Administrator typically creates the VOBs. For details about creating VOBs, see Setting Up ClearCase VOBs in the ClearCase Administrator’s Manual. The same manual also contains details on selecting a VOB server machine and sizing requirements. If you are a Rational technical representative, refer to Appendix B for pointers to white papers about server sizing.
Essential VOB Maintenance
Since VOBs contain all the elements and version history for the entire system, it is critical that your system administrator backs them up. For more information, read about VOB and View Backup and Restore in the ClearCase Administrator’s Manual.
Defining the Product Directory Structure
This section discusses defining and creating the directory structure for the project. A product directory structure defines a central location for all of the product’s configuration items. We recommend that you start with the directory structure shown in Table 1 to organize your product and its configuration items. You may modify this structure to meet your product’s and project’s needs.
| VOB | Directories in the VOB | Typical Contents |
| system | plans | Project plans, vision statement, etc. |
| requirements | Requirements documents | |
| models | Rose files, other architecture related data | |
| documentation | Project-level documentation | |
| subsystem_1 through subsystem_n
(one VOB per subsystem) |
requirements | Subsystem requirements |
| models | Subsystem model files | |
| source | Source files for this subsystem | |
| interfaces | Subsystem public interfaces | |
| binaries | Executable and other binary files for this subsystem. No version control on files. | |
| libraries | Libraries for the subsystem that are built into here. No version control on files. | |
| tests | Test scripts and artifacts for this subsystem. | |
| system_test | scripts | Test scripts |
| results | Test results and logs | |
| documentation | Test documentation | |
| deployment | binaries | Staged executables |
| libraries | Staged libraries | |
| interfaces | Staged interfaces | |
| documentation | System documentation |
Table 1. Suggested directory structure
Creating a Workspace
At this point, you have created the system VOB and one or more subsystem VOBs. You have also defined your product’s directory structure. Before you can create the directories, you need to create a workspace. In ClearCase a workspace is called a view. There are two types of views supported in ClearCase: dynamic and snapshot. To establish the product directory structure, use a dynamic view because a snapshot view copies files and requires system resources unnecessary to this task. For more details on views and view creation see Setting up a View in the ClearCase User’s Manual. When you create the view, use the default configuration specification (which is provided by ClearCase).
Creating the Directories
To create the product directory structure, work in the view you just created. Use either Windows Explorer, the ClearCase Details tool, or an IDE to create directories. Select the directories you created and use the Add to Source Control ClearCase command to place the directories under version control. For more information on adding directories to version control, see Version Control of Directories in the ClearCase Concepts Manual.
Managing a Software Project in a ClearCase Environment
This section enumerates the steps for setting up and managing a software project using ClearCase. The goal of the project can be to develop a new system or to deliver a modified version of an existing system. For small systems there may be one single project team. For large systems, there may be multiple project teams. This section is focused on an individual project team of developers. Later sections discuss how multiple project teams can interact when working on a very large system.
The first step is to establish one or more project teams. For example, if you are developing the first release of a small system, you may have one project team of 10 people. However, if the system is large, multiple project teams may be collaborating to produce the entire system. Dividing your development staff into smaller teams means you must also divide the work.
Mapping the Architecture to Subsystems discusses mapping an architecture to subsystems to make software development more effective. Fortunately, this mapping also makes configuration management more effective. Assign one or more subsystems to each project team so that the work of one team does not overlap with the work of other teams. When project teams developing disjoint sets of subsystems integrate their work, they rely on well-defined interfaces between the logical packages contained in those components. It is critical to your success that you define these interfaces at the beginning of the project. This approach of assigning work by subsystem is highly effective in facilitating component-based development.
Depending upon the size of the team and the size of the subsystem you may want to divide the work further among packages within the subsystem. This has the advantage of decreasing the overlap of two people working while developing the same subsystem.
It is not always possible or desirable to divide work along subsystem or package boundaries. In this case, you may need to perform additional configuration management work during system integration. For example, you may need to integrate (in ClearCase terms, merge) changes made by two project teams to the same subsystem elements. ClearCase provides tools to support merging. You may encounter this situation if your project has common system files which will be modified by more than one project team.
Creating the Project Label
In ClearCase, a label identifies a specific version of an element. For a set of elements (for example, the elements that make up a subsystem) you often apply a label to one version of each element. Later, using the label as a selection mechanism, you can recreate or reference the original set of element versions. Labels are also used to identify stable points in the project and to identify the versions that are ready for construction. Before you can apply a label, you must create a label type.
At the beginning of a project, the CM Administrator:
- Creates a project label type in all the VOBs (subsystems) which that project may modify or reference.
- Applies the label to all elements in the project VOBs.
This section shows you how to create the following label type, which you will use to identify the candidate versions for a build:
- <PROJECT>_BUILD_CANDIDATE identifies a potential baseline of versions which will be built and smoke-tested. This label will be applied to all the versions that have been promoted for integration. It identifies the fixed set of versions ready to be built. This label is also applied to referenced subsystems to identify the version of those subsystems which your project should reference during a build.
Creating the Label Type
In ClearCase Home Base, click Type Explorer. For each project VOB, create the project build label type, as summarized in the following table. The naming conventions used here are recommendations only; you should modify them to suite the customer. The important point is to establish and use a naming convention. Labels are in upper case, by ClearCase convention, and we recommend that you retain this convention.
| Label | Example | Identifies |
| <PROJECTt>_BUILD_CANDIDATE | T2K_GUI_BUILD_CANDIDATE | The versions of sources that have been promoted and are ready to be built |
Table 2. Recommended build label
Alternative: Administrative VOBs
In ClearCase, you need to define a label type in every VOB in which you want to apply the label. Alternately, you can define the label type once if you use an Administrative VOB. You can then propagate the definition to other VOBs. We recommend that you establish the system VOB as the Administrative VOB. To make this work, mark the label types as global when you create them; otherwise they will not be propagated. For more information about working with Administrative VOBs, read about Administrative VOBs and Global Types in the ClearCase Administrator’s Manual.
Identifying the Initial Project Baseline
After you create the project label type, identify the initial starting point for the project. If you are starting a system from scratch, there may not be any code yet which can serve as the starting point. In this case, you do not have to worry about an initial project baseline. In this case you will work on the main branch. For an existing system, however, you can identify the set of versions to start from. This code may be imported from another repository or it may be the endpoint of a previous release.
To establish the initial project baseline, you apply the project label you defined in this section to all elements in all VOBs in the system. For more details, see Creating a Baseline for a Subsystem and the System.
Once your project team has been established and you know what subsystems you will be working on, the CM administrator creates view profiles for the project. ClearCase view profiles encapsulate the details of your development team’s work environment. A view profile:
- Contains information about which VOBs (subsystems) need to be available.
- Specifies where to create and promote versions (in ClearCase terms, on which branch you will work)
- Identify the stable baselines that are available for the project team.
View profiles serve as templates for views. A developer creates a view and associates it with an existing view profile. When you use view profiles for your project, developers no longer need to worry about the details of configuring their working environment – the details of how to select the right versions of files to work on and how to promote changes – ClearCase automates these tasks. View profiles support a specific usage model for effectively using ClearCase. By adhering to this model, your team can take advantage of several areas of automated support, allowing you to benefit from the advanced features of ClearCase.
Using the View Profile Explorer
To create view profiles for your project, start the View Profile Explorer. Define a project folder to contain all the view profiles for your project. Then create your project’s view profiles and store them in the project folder. Start by defining two view profiles: a development profile, and a build profile. For more information about view profiles see Managing Parallel Development on a Project using View Profiles in the ClearCase User’s Manual.
Creating the Development View Profile
In the View Profile Explorer, select the project folder and create a development view profile. This will serve as a foundation for work done by both the developer and the integrator. Supply details about the view profile as follows:
- Name the view profile descriptively, for example, thorn2k_release1 or thorn2k_gui_release1.
- Provide a description of the view profile. The description helps a developer pick the right view profile. The description should describe the type of work done using that view profile (for example, for development for release 1 of Thorn 2000).
- Describe the scope of work for the view profile – what subsystems may be modified or referenced during development. Since each subsystem is stored in its own VOB, select the VOBs which pertain to the subsystems that your project will need to modify and reference. ClearCase will automatically ensure that these VOBs are available to users who work with this view profile.
- [Optional] Large systems may have one central administrative VOB. The administrative VOB contains all meta-data used by other project repositories. As described in Allocating Subsystems to Project Teams, we recommend that you use the system repository (or system VOB) as the administrative VOB. For more information about setting up and maintaining administrative VOBs see Administrative VOBs and Global Types in the ClearCase Administrator’s Manual.
- Select the branch on which the project work will be performed. A ClearCase branch contains a linear sequence of versions. The branch is the location where you want new versions to be created. Each element in ClearCase has an initial branch, main. You are prompted to select the main branch or another branch for development work. In general, select another branch. See When should you work on the main branch? later in this section for more information.
- A branch other than main is called the integration branch for your project. You use an integration branch to collect changes made by all project developers.
When you designate an integration branch for your project, you are prompted for a checkpoint label. The label you specify must identify a baseline of the entire system. This is the initial project baseline. Because you are storing each subsystem in its own VOB, the label applied to one version of every element in that VOB forms a baseline for that subsystem. A label applied to all VOBs serves as a system baseline label.
When you supply or select the checkpoint label, you are identifying the baseline of the entire system from which you want to start your work. If you do not have an existing checkpoint label to use, then you should either create one or refer to Step 5 to determine whether you should be working on the main branch. Creating a Baseline for a Subsystem and the System discusses how to apply labels to subsystems and how to identify a single baseline for the entire subsystem.- Identify the integration branch for your project. Each project team should use its own project integration branch. For example, if you are working on release 2 and have two teams A and B, create two branch types release2_a and release2_b. If both projects use the same branch, then both teams will see promoted changes for the other team. By using different branches, you can defer seeing another team’s changes until the team reaches a stable point. Create the project branch type if it does not already exist.
When should you work on the main branch?
Typically, you use the main branch to store released versions of a system. In practice, the main branch may also contain intermediate versions created during a stabilization phase just before a release. We recommend that you create a new version on the main branch when you believe it will be the final version. Of course, you may need to make minor changes on main during the final integration test phase.
Under some circumstances you may chose to work directly on the main branch. Working on the main branch can reduce some configuration management overhead associated with branching. It is appropriate under the following circumstances:
- You are starting to develop a new system from scratch.
- You are developing a system with one project team. Only one release of the system is developed at the same time. You do not need to support previous releases.
In general, you should not work directly on the main branch. This is particularly true if your system is large and you have multiple projects working on the same system. If you do not meet the above criteria, select the option of working on a separate branch.
Example
Figure 4 illustrates these concepts. The left side of the figure shows development proceeding on the main branch. The right side of the figure shows that development has occurred on the main branch. The release1 label denotes a project baseline from which the release2 branch was started. Development is proceeding on the release2 branch. This picture may be incomplete; it is possible that work is simultaneously taking place on other branches, too.
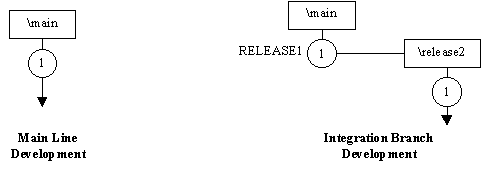
Figure 4. Development on branches
Creating the Build View Profile
Now create a build view profile. The build view profile defines a stable source base
that the integrator can perform builds against. Initialize the build profile with the
values from the integration view profile you just created. Edit the view profile
configuration specification. Add the following line in the blank line surrounded by
comments:
element * <PROJECT>_BUILD_CANDIDATE -nocheckout
This change provides the integrator with a stable set of versions to build. The –nocheckout rule ensures that you do not accidentally checkout files in any build views.
ClearCase supports the creation and use of isolated workspaces. A workspace, called a view, allows developers to make and test changes in private before sharing the modifications with the rest of the team. To provide the broadest range of support for workspace isolation, ClearCase supports two types of views:
- For the usage model described in this document, developers should create snapshot views. A snapshot view provides the developer with a stable, unchanging working environment. When a developer wants to see changes made by other team members, she updates her view. This style of working is characterized as a pull model.
- ClearCase also supports dynamic views. Dynamic views offer immediate updates because no local copies of files are made. Dynamic views also offer build auditing. The tradeoff of using a dynamic view is the expense (in terms of speed and network reliability) of working over a network. In the model described in this document dynamic views are used for the integration view and build views.
This document does not describe using dynamic views for development, but dynamic views may be the best choice in the following situations:
- You have limited client-side disk space
- You would like to audit development builds
- You want to take advantage of derived object sharing
- The development team must work with the latest versions of the code
For information about creating a dynamic view, see Setting up a View in the ClearCase User’s Manual.
Creating the Snapshot View
When you are ready to do development work, create a snapshot view. We suggest that you use the naming convention <user>_<project> (for example, chris_t2k_gui). During view creation, associate this view with the correct view profile, generally the development view profile. Once you create the view and associate it with a view profile, you can begin work.
For information about creating a snapshot view, see Setting up a View in the ClearCase manual Using Snapshot Views.
Working with Configuration Items
Once you create the view and associate it with a view profile, you can begin work. The primary operations a developer performs are:
Check out – Gives you permission to change an element
Check in – Stores a new version of the element that you changed
Add to Source Control – Places a new file or directory under version control,
creating the initial version
Promote – Submits your changes to the integrator. There are two styles of
promoting changes: promote-on-checkin and as part of a Finish Private Branch operation,
described in Coordinating
Team Development Efforts.
Update – Makes changes made by other developers available to your view.
Generally, you work with snapshot views in the following manner:
- Check out the files that you want to change.
- Make changes.
- Perform unit tests to verify the changes.
- Check in the changes.
- Promote the changes, either as part of Step 4, or as a separate step.
- Periodically update your snapshot view.
For more information about developing with ClearCase, see the following sections of the ClearCase Manual Using Snapshot Views:
- Working in the View
- Updating a Snapshot View
- Using Snapshot Views with Microsoft® Visual Studio 97
- Working on a Team
ClearCase directly supports two styles of promotion: promote-on-checkin and explicit promotion using a private branch. During the course of a project, you can expect to use both of these methods. This section discusses both styles of promotion and describes when to use each. It also discusses updating your view and gives guidance on when and why to update.
Promote-on-Check-in
In this model, you begin by checking out the files you want to change. Checking out creates a private copy of a file. Once you finish the changes and complete unit testing, you check in the files. As soon as a file is checked in, it is ready for integration. That is, by checking in a file, you declare that it is ready for integration. Other developers will not see your changes until they update their snapshot view.
With promote-on-checkin, the need for merging is minimized because all work is performed directly on the project’s integration branch. Merging is only required when you modify a file which another developer is currently changing or has already changed since the last time your view was updated. You can optionally install a ClearCase trigger to warn users when they are about to make concurrent changes to a file. Appendix C contains the code for this trigger.
When to Use Promote-on-Checkin
Use promote-on-checkin when you are:
- Making quick stabilization changes on the integration branch
- Making small changes which require 3 or fewer days of effort
- Coordinating small teams of fewer than 8 developers
Promote-on-checkin has the following drawbacks:
- You cannot create intermediate versions of partially completed changes. As soon as you check in the file, the partial changes become visible to everyone.
- You cannot check in work in progress, so that intermediate work may not be backed up.
- Checkouts which last a long time can hinder parallel development on shared files. (ClearCase does permit unreserved checkouts on the same branch. However, when you check in from an unreserved checkout, you may be required to merge your changes.
- If you update a snapshot view before completing a change, your working environment may become inconsistent.
Updating Your View using Promote-on-Checkin
If you are not working on a private branch, you should update your view to see changes submitted by other developers every time you finish a change of your own. From ClearCase Home Base, click Update Snapshot View.
If you update your snapshot view before finishing your changes you may create an inconsistent development environment if the files you are working on have been modified by another developer. Therefore, take care when performing an update while changes are still underway.
Working with Private Branches
The other method of promotion, working on a private branch, is enabled by the use of view profiles. When you use a private branch, you are free to check in and check out any files you need, without affecting the rest of the team. Changes are available to the rest of the team only after they've been completed and tested. In this model, you set up a private branch, checkout files, change them, check in files, unit test, and finally, you complete the private branch.
Private branches require you to merge when you complete the private branch, but they eliminate the drawbacks of using the promote-on-checkin model. Further, ClearCase provides tools that help you manage the merge successfully. If you have divided the work by subsystem and packages, most if not all of your merges will be trivial. Even if you have not divided the work according to the recommendations in this paper, most merges will be trivial. A trivial merge occurs when changes were made to an element on exactly one branch. A trivial merge requires no manual intervention.
When to Use Private Branches
Use private branches when:
- You want the ability to checkpoint your work
- You are making changes that will likely take a long time
- You are making changes that may destabilize the project (for example, a database schema change or an interface change)
- You are making changes that may not be included in the current release
When you work with private branches, pay attention to the following points:
- You are working on a different branch, meaning you will need to perform a merge to promote your changes. While this is usually a trivial operation, it may require manual intervention if others have made changes to the same file while you were working on the branch.
- Unless your CM administrator installs a ClearCase trigger, you will not be notified if someone else is also working on the same element on their own private branch (See Appendix C).
Setting up a Private Branch
ClearCase makes working on a private branch simple. To create a private branch, click Set up a private branch in ClearCase Home Base. Follow the Setup Wizard prompts. Supply the following information:
- A name for the branch you are creating.
- Answer no when asked if you want to base the private branch on the latest versions as of the current time.
There are times when you may want to use a time rule as a branch point. Typically, you finish a private branch, you want to start work on a new change, you want to see the change you just finished, and the change you just finished has not been included in a project baseline. In this case, you can choose to start a private branch from the latest versions as of the current time. The disadvantage to this approach is that these latest versions may not constitute a stable set of sources. For development teams who have the discipline to maintain a stable integration branch, this is a viable option.- Select a View Profile checkpoint label.
The View Profile checkpoint labels identify versions that serve as the branch point when creating instances of your new private branch. The labels listed here identify stable starting points on which your private branch will be based. In general, choose the default, which is the last label added to the view profile by your project leader or CM administrator and which identifies the latest known stable point on the integration branch.
Finishing the Private Branch
You promote your finished changes by finishing the private branch. This action makes your changes available to the integrator and other team members who may be working on the integration branch. To finish the private branch, check in all the files in your view. In ClearCase Home Base, click Finish Private Branch. You are prompted to do one of the following:
- Leave the current set of changes on the private branch
If you select this option, all work is left on the private branch, as-is, but the current view no longer selects those particular versions. Select this option when you have worked on a change, but you want to abandon it either temporarily or permanently. The view is reset to select versions on the integration branch. It no longer selects the changes you made on the private branch.- Merge the current set of changes onto the integration branch
You will usually select this option to promote your changes to the integration branch. The Merge Manager starts, seeded with all the information it needs to start the merge. It presents a list of all versions that require merging as part of the current change. ClearCase can handle all trivial merges automatically. Non-trivial merges may require your intervention. Remember to check in your changes on the integration branch after you have completed the merge.
Updating Your View using a Private Branch
A snapshot view is updated automatically whenever you perform the Finish Private Branch operation. Avoid updating a snapshot view if you are working on a private branch. If you do choose to update, you need to follow some additional steps to ensure the update is performed properly. If you do not use the steps outlined here, you can end up with a skewed configuration because a single element may be changed on the project branch as well as on your private branch.
Rebasing
In CM terminology, updating a private branch manually is called a rebase operation. You started by basing your private branch on a stable point identified by a label. When you rebase, you update your private branch so it is based on a newer stable point on the project branch, and it still contains the changes you have made on the private branch. Here are the steps for a rebase:
- Check in any files that are currently checked out.
- Perform a Finish Private Branch operation. Select the suspend option without merging your changes. This resets your view back to the integration branch. For efficiency, you can cancel the update to your view.
- Perform a Setup Private Branch operation. Select the original settings, but select the new baseline label you want to update to. Answer yes to the warning that you are selecting an existing branch.
You are now viewing the new baseline for any files you have not modified. The next few steps describe how to use the Merge Manager to resolve any conflicts in the files you modified.- Start the Merge Manager from ClearCase Home Base.
- Select all the VOBs in which you have made changes. When in doubt, include it!
- Perform the merge based on a label, and select the same baseline label you just updated to.
- Merge all files that the Merge Manager lists. These are the files which have been updated by someone else since you started working on your private branch. In this step, you are integrating their changes with your own.
- Test and check in.
The rebase operation is complete. For more information, see Updating a Snapshot View in the ClearCase manual Using Snapshot Views.
During your project, you will want to identify fixed sets of versions of files and directories. These fixed sets are called baselines, which often represent project milestones. You can identify baselines for a subsystem, or for the entire system. As mentioned earlier, you use labels to identify baselines.
In Allocating Subsystems to the Project Teams you created the <PROJECT>_BUILD_CANDIDATE label. This label is moved to new versions over the course of a project so that it always identifies the versions you will use in the next build. By contrast, to identify baselines, you create labels that you apply once and that you never move. For example, when you reach Baseline 1, you might create a label, T2KR1.BL1, and apply it to all the versions in Baseline 1. When you reach Baseline 2, you repeat the process. You create a label, T2KR1.BL2, and apply it to all the versions in Baseline 2.
You will use two types of labels: project labels and system labels. Project labels identify all the versions of files and directories in the subsystem or subsystems (VOBs) that your project modifies. System labels identify a single version of all files and directories in all subsystems. A project label may be attached to only one subsystem, while a system label is a baseline for your entire system. For some projects, of course, there may be no distinction.
Advantages of Using Project Baselines
Defining project baselines has the following advantages:
- A baseline provides a stable point from which individual team members can create private branches, isolating themselves from ongoing changes to the project's main branch.
- A baseline is a stable point from which new projects can create a project branch, isolating themselves from subsequent changes to the existing project's main branch.
- A baseline provides a simple way for a team to roll back changes to the project’s main branch, if those changes are deemed unstable or suspect.
- A baseline can provide a simple way to reproduce a reported bug because you can recreate the configuration where a particular release was built.
Creating Baseline Labels
Create a label in two steps: first create the label type and then apply the label to versions. Alternately, you can use the Apply Label wizard to do both operations at the same time. Apply a baseline label to a stable set of versions, usually those identified by the <PROJECT>_BUILD_CANDIDATE label after the build has been performed and the project has passed a smoke test. Use a build view which selects the <PROJECT>_BUILD_CANDIDATE label to apply baseline labels. (For more information about creating label types see Creating Project Build Labels in Allocating Subsystems to the Project Teams. For more information about creating a build view, see Integrating, Building, and Testing the Project).
We suggest that you use a standard naming convention for baseline labels. Here is an example:
<SYSTEM>[_<PROJECT>]_[R|A|B]<X>[.<Y>.<Z>][.BL<#>]
where:
<SYSTEM> is a system identifier
<PROJECT> is an optional project identifier
R|A|B stands for release, alpha, or beta
<X> is a major release integer (for example, 1)
<Y> is an optional minor release integer
<Z> is an optional alternative release integer (used for patches, ports, etc.)
BL stands for base level (identifies an internal release)
# is an integer number for internal releases
Here are some examples:
T2K_R1.0 Release 1 of the Thorn 2000 system
T2K_GUI_R2.0.BL5 Internal release of the GUI system intended for delivery in public
release 2
T2K_B1.1 Beta release 1.1 of the Thorn 2000 system
T2K_R2.0.BL16 Internal system baseline #16 of thorn 2000 intended for creating public
release 2
T2K_R1.0.5 Maintenance release of Thorn 2000
Note: A system label does not have a <PROJECT> component. Apply system labels to all the subsystems (VOBs) that comprise the system. Subsequently, if you specify the system label in a configuration specification, you will select a version of the entire system.
Note: Applying a label to a large number of VOBs which contain a large number of elements can be a time consuming operation. The approach outlined here uses these labels for both external releases as well as for internal releases which identify stable builds. If a customer has a very large system, consider using other approaches, such as time rules, to identify internal baselines.
Adding a New Baseline Label to the View Profile
Whenever you have defined a new project baseline, add the baseline’s label to the project’s development view profile. If you are using the naming convention outlined above, you would add the labels containing BL# to the view profile. These labels are used by developers as stable starting points for private branches and as stable points from which to update snapshot views.
From the View Profile Explorer:
- Select the view profile.
- From the context menu, select Define new checkpoint. (Checkpoint is the view profile term for a baseline.)
- Add the new baseline label you defined and applied. The view profile tool will ensure that this label has been attached to all the necessary VOBs.
The view profile tool places the label at the top of the list. The top label is the default label which is presented to developers when they create a new private branch.
This section describes the work typically done by an integrator: integrating, building, and testing the project.
Creating and Using an Integration View
The integrator creates an integration view that selects all the promoted development changes. The integrator then identifies which versions can be built by using the integration view to apply the <PROJECT>_BUILD_CANDIDATE label. This procedure is described below.
Create a dynamic view for integration (for example, t2k_gui_integration) and associate it with the development view profile you created in Creating and Maintaining View Profiles. Because you are using a dynamic view, your view selects the latest versions on the integration branch. These are all the versions that have been promoted.
Use the Apply Label tool to apply the <PROJECT>_BUILD_CANDIDATE label:
- Use the integration view you created.
- Apply the label in all the VOBs that your project team modifies and references.
- When you are asked to Move existing label, answer yes.
- Use the build view.
- Create and apply the <PROJECT>_<RELEASE>.BL<#> label.
- It should be applied to all VOBs used and referenced by your project.
As team members promote changes over the course of the project, reapply the <PROJECT>_BUILD_CANDIDATE when you are ready to integrate development work. You may perform new builds nightly, weekly, or at any interval you choose. Do not move this label while you are doing a build or applying a baseline label to a known stable build.
Creating and Using a Build View
The integrator also builds the system or subsystems. Create another dynamic view (for example, t2k_gui_build). It is important to create a dynamic view for these official builds so that ClearCase audits the derived objects created during the build. After the build, you can use the audit to determine how each output file was constructed and which element versions were used during its construction.
Associate this build view with the build view profile for the project. The build view now selects the versions with the <PROJECT>_BUILD_CANDIDATE label, that is, the versions of elements ready for a build of your system or subsystems. You can start this view on your machine and perform the project build.
Backing Out a Change at Build Time
On rare occasions, it may be necessary to replace one or more versions of files in a build. For example, some file does not compile. For each file that has this problem, you can manually move the <PROJECT>_BUILD_CANDIDATE backward on the integration branch. Generally, you should move the label to the version which is identified by the latest stable baseline label. The easiest way to make this change is from the Version Tree Browser. This technique can be problematic, since there is no easy way to identify what other files were modified as part of a complete change. However, this technique can be helpful in getting a clean build.
You can also move a label forward on one element to accept a single change. We recommend that you do this rarely. Be aware that the option exists when you are dealing with unusual circumstances.
Making changes visible to developers
Once a build has been accepted and is "known to be stable", create the
<PROJECT>_<RELEASE>.BL<#> label and apply it to all versions that are
identified by the <PROJECT>_BUILD_CANDIDATE label. Increment the integer # for each
new project build label. Use the Apply Label tool:
Releasing the Project
When you are ready to release the project, we recommend that you place the deliverable files under version control. This process is called "staging". Typically, you create a new VOB, containing the deliverable files only, and with a directory structure that is appropriate for the final product. For example, if your subsystem is delivering a library, place the library and its public header files under version control in the deliverable VOB. If you are delivering an entire system, then store the executables, libraries, and documentation in a deliverable VOB. For files which are not built, the deliverable VOB can contain links to the actual source files in other VOBs.
Depending on the number of files that you are delivering, you may need to automate this process in a make file or by using another scripting facility. The process involves checking out an element from the deliverable VOB, copying the file from where it was built, and checking the file back in. If you are using build auditing to track how each built file was constructed, use the checkin –from option to preserve this information in the deliverable VOB.
Once the built output files are placed under version control, apply the baseline label (the same label applied to the source files) to the deliverable output files.
Referencing Subsystems between Projects
What if your project works on more than one subsystem?
In general, ClearCase view profiles support work on an entire system. They generate a configuration specification which specifies the versions to select and they define where to place a checked-out file. However, you may be working on a collections of subsystems rather than an entire system. Consider that different teams create baselines at different times. For example, you may want to work with Baseline 3 of one system and Baselevel 15 of another. Therefore you want the flexibility to select different versions of each subsystem, rather than selecting a single version of the entire system to work on.
Selecting a different version of other subsystems
The process is best described through example. You are working on the Thorn 2000 system, with three subsystems: GUI, storage, and modeler. The overall plan is to develop release 2 of Thorn 2000. The work has been divided into three subteams: the GUI project, the storage project, and the modeler project. You are in charge of the GUI project. There are four VOBs, \thorn2000 which holds the project related data, models, requirements, and other documentation. \t2k_gui, \t2k_storage, and \t2k_modeler, which hold the source code for each subsystem.
To select different versions of subsystems, add configuration specification rules to the development view profile. This example will show you how to add some of these rules.
When you set up the integration view profile, you select release2 as the branch
type on which to work. As a starting baseline for the release 2 work, you have selected
the t2k_r1.0 system label which identifies the first release of the Thorn 2000 system
across all subsystems. The default configuration specification generated for the
integration profile looks like this:
# [CC_PROJECT - Checked Out Rule
element * CHECKEDOUT
#
# Any modifications to the Profile config spec should
# be made following this comment.
# CC_PROJECT]
# [CC_PROJECT - Profile Config Spec
# Do not directly modify the text below, it has been
# automatically generated by the ClearCase View Profile
# Tool. To change the Profile config spec, use the
# ClearCase View Profile Wizard to update the Profile
# status as needed.
element * ...\release2\LATEST
element * T2K_R1.0 -mkbranch release2
element * \main\0 -mkbranch release2
# CC_PROJECT]
The asterisk (*) after the element identifier applies the rule to all elements regardless of the system or subsystem in which they are contained. To select specific versions of a specific subsystem, add a line to the view profile in the place indicated in the comments.
For example, say we know that the modeler subsystem has already created a new version
that has passed its initial test. It has a new baseline label, T2K_MODELER_R2.0.BL1. The
bl identifies an internal baseline and the 1 is an incremental number. To select this
baseline for the view profile, add the following line:
element \t2k_modeler\… T2K_MODELER_R2.0.BL1
This line selects the T2K_MODELER_R2.0.BL1 version of all the elements (files and directories) in the t2k_modeler subsystem.
Here is the final configuration specification:
# [CC_PROJECT - Checked Out Rule
element * CHECKEDOUT
#
# Any modifications to the Profile config spec should
# be made following this comment.
# CC_PROJECT]
element \t2k_modeler\… T2K_MODELER_R2.0.BL1
# [CC_PROJECT - Profile Config Spec
# Do not directly modify the text below, it has been
# automatically generated by the ClearCase View Profile
# Tool. To change the Profile config spec, use the
# ClearCase View Profile Wizard to update the Profile
# status as needed.
element * ...\release2\LATEST
element * T2K_R1.0 -mkbranch release2
element * \main\0 -mkbranch release2
# CC_PROJECT]
Hint: After you move the <PROJECT>_BUILD_CANDIDATE label in the project VOBs, you only need to specify individual subsystems (VOBs) when you change the version you are selecting.
For more details on configuration specifications, see Defining View Configurations in the ClearCase User’s Manual.
Advanced Topics
This section describes the ramifications of working in a more complex environment.
Coordinating Multiple Projects
This section addresses software systems which are large enough to require multiple software teams and projects to deliver a single release. This section focuses on techniques to coordinate the development of a software system in parallel.
The View Profile tools support a commonly used model for performing work under ClearCase. The model uses the following key techniques:
- Maintaining the stability of the source base with a baselevel-plus-changes development strategy
- Use of integration branches to support parallel development at the inter-project level
- Use of private branches to support parallel development at the intra-project level
Each of these techniques builds on, and is often required by, the other.
To maintain the stability of a source base, it is important to build and test on a regular basis. The frequency and rigor of the testing varies by organization. Some teams perform sanity tests as part of a nightly build process. Others ask a QA group to test all changes made in the last month. Other groups do both.
Each project team establishes appropriate milestones for their project. These milestones are points at which you can assess the stability of the source base and eliminate problems before they have a chance to perturb other parts of the system.
Typically, the project leader labels the versions that make up a particular milestone, thus providing a convenient way to refer to the constituent versions as a whole. This type of label is referred to as a checkpoint label, and the versions to which it is applied make up a baseline.
The project baselines, which identify one or more subsystems, can be delivered to a systems integration testing group for system level tests. A systems integration test assembles the subsystems by selecting a baseline for each subsystem deliverable. This assemblage constitutes a complete system which is then built and tested.
System testing is typically done by a separate system integration and test organization. This group creates a dynamic view and uses the same techniques described in the previous section to select the full set of subsystems which comprise a complete system. At this point they can build and test a version of the entire system. This group also applies a system release label across all subsystems once a build passes final acceptance testing.
Alternately, another group can perform builds. In this scenario, the system integration and test group assembles subsystems by selecting versions from the deliverable VOBs rather than from the source VOBs. Testing is done directly on the deliverable output files.
Complicated environments are likely to require a combination of these two approaches.
Coordinating Multiple Parallel Releases
Previous sections address development to produce a single release of a software system. Managing multiple releases of a software system in parallel introduces additional complexities. For example, consider a situation where Release 1.7 of a software system is developed in parallel with Release 2.0.
A group of developers collaborating on a project must agree on where to promote changes. Earlier sections discussed the integration branch, the area where changes are promoted and where the system is built and tested. Similarly, teams working on parallel releases need to identify when to integrate changes from all the releases. To continue the example, at some point, the Release 1.7 changes need to be incorporated into Release 2.0. If this is not done, bugs fixed in the 1.7 release may reappear in the 2.0 release. ClearCase supports this goal by allowing you to identify a separate integration branch for each project.
To implement a successful branching strategy between parallel projects, you must identify a stable point at which to create instances of the intended branch. You must also plan the eventual merge of these changes. The branch point will typically be a stable point from a previous project. For example, a new project might create branches from the versions that were used for the final build of the previous project.
You usually decide to establish a new integration branch for a project when an existing integration branch, such as main, is already being used for another purpose. In this case, keep the two projects isolated from each other's changes, at least temporarily.
For more information about how to handle branching and integration of changes in these situations, you can refer to Working in a Parallel Development Environment and Using ClearCase to Organize and Implement Parallel Development in the ClearCase User’s Manual.
Appendix A: Glossary
The following terms are used in this paper. Where appropriate, the mapping between ClearCase terminology and more common terminology is presented.
| Term | Definition |
| Architecture | The highest-level concept of a system in its environment [IEEE]. The architecture of a software system (at a given point in time) is its organization or structure of significant components interacting through interfaces, those components being composed of successively smaller components and interfaces. |
| Baseline | A named version of elements. Represented by the application of a label in ClearCase. May also be referred to as a checkpoint. |
| Build Workspace | A view configured to select the versions of a project identified as candidates to be included in the build. |
| CM Repository | The database that stores configuration items. In ClearCase, a VOB (versioned object base). |
| Component-Based Development | A development strategy which improves the quality and time to market of a large-scale system by decomposing the system into components with known interfaces. Also refers to the development strategy of assembling reusable components with a few changes to quickly develop a new system. |
| Configuration Item | A physical file or directory which is under configuration management. It is either atomic (in ClearCase, an element) or composite (a subsystem). |
| Configuration Management (CM) | The process of combining and evolving the logical and physical artifacts of a software system to produce a set of physical artifacts that can be deployed and subsequently run on a user’s platform. |
| Configuration Specification | A set of rules which defines the scope and individual versions to display in a ClearCase view. |
| Integration Branch | The branch where the system integration occurs and to which development changes are promoted. |
| Integration Workspace | A ClearCase view which selects the set of versions that have been promoted by developers and that are ready for integration. |
| Package | A group of logical entities that have a well-defined interface and boundary. |
| Promote | Make a set of elements available to other members of the team. There are different types of promotion, for example, promotion to other developers and promotion to the integrator. |
| Subsystem | A group of files and directories which are versioned, shared, and released as a single unit. Generally you store each subsystem in its own VOB. |
| System Repository | A CM Repository which holds system-wide or system-level data. |
| Update | Causes newer versions in the VOB to be made visible in a snapshot view. |
| View | A ClearCase mechanism used to display a specific set of versions. |
| View profile | A set of rules that imply a scope of work and configuration specification for a view. A view plus a view profile define a workspace. |
| VOB | Versioned Object Base, see CM Repository |
| Workspace | A place to work without interfering with other team members. In ClearCase, a view. |
| Workspace profile | In ClearCase, a view profile. |
Appendix B: References
This paper refers to the following additional material in the ClearCase Version 3.2 Documentation set:
Using Snapshot Views
User’s Manual
Administrator’s Manual
Concepts Manual
Appendix C: Process Support
This section provides the code for a ClearCase trigger, written in Perl, which you can install. The trigger warns a user who is checking out a file which is already being modified by another developer. The trigger will work if the checkouts are on the same branch or if they are on different branches.
######################################################################
# Perl Pre-checkout trigger to warn about parallel work on an element
######################################################################
# Setup the file separator and temporary file name
$S = "\\";
$TMPFILE = $ENV{'TMP'} . $S . "othercos_tmp" . $$;
# List existing checkouts for the element being checked out (CLEARCASE_PN)
# and format the output for display.
system( "cleartool lsco -fmt \"User %Fu has checkedout version %PVn\\n\" \"$ENV{'CLEARCASE_PN'}\" >$TMPFILE 2>&1");
# Read command output into an array
open(IN, $TMPFILE);
@OUTSTR = <IN>;
close (IN);
# Delete the temporary file
unlink ($TMPFILE);
# If there are other checkouts on this element then
if (@OUTSTR) {
# prompt the user to proceed or abort
$result = system("clearprompt proceed -prompt \"@OUTSTR\"");
$result = ($result >> 8) ? 1 : 0 ;
if ($result) {
# Abort checkout
exit 1;
} else {
# Proceed with checkout
exit 0;
}
}
# If no output from the lsco command just proceed.
exit 0;
![]()