Tool Mentor: Using RequisitePro to View the History of a Requirement
Purpose
This tool mentor tells how to view the history of a requirement in RequisitePro.
Rational Unified Process Related Steps:
Overview
This Tool Mentor is applicable when running Microsoft Windows 95/NT 4.0.
As requirements are created then modified, the history of requirements allows you to keep track of the what, when, why and who of these actions. Requirement history provides powerful information such as:
- How often your requirements change (too much change too quickly may be indicative of an ill-defined requirement),
- Who modified a particular requirement (so that you can consult that person and understand his/her motives before validating or invalidating that change),
- Why a requirement has changed (rationale),
- What caused a relationship between two requirements to become "suspect".
The history of a requirement is particularly useful during impact analysis to decide whether a requirement change has an impact on requirements it is linked to.
- Viewing the history of a requirement
- Performing impact analysis
- Tips on successfully recording the history of requirements
1. Viewing the History of a Requirement 
The history of a requirement in RequisitePro is located in the Revision tab of the Requirement Properties dialog. This dialog is accessible from either the Word workplace or the Views workplace.
From the Word workplace:
- While viewing a document in the Word workplace, position your cursor in the text of a requirement.
- Select Requirement=>Properties from the RequisitePro Tool Palette. The requirement Properties dialog is displayed.
From the Views workplace:
- While in a view, select the requirement row and right-click to display the context-sensitive menu.
- Select Properties from the popup menu. The requirement Properties dialog is displayed.
Once the Properties dialog is displayed:
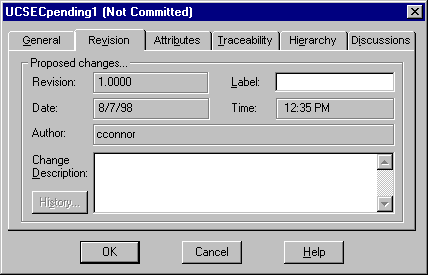
- Navigate to the Revision tab. This pane displays the last change made to that requirement. The date, time, author and change description (rationale, why of the change) are shown.
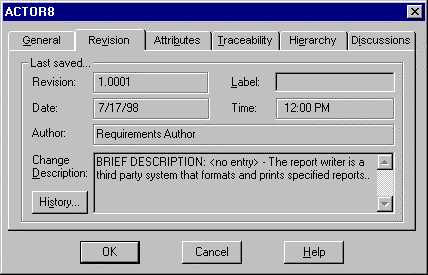
- Click on the History… button. The Revision History dialog displays all modifications made to that requirement from the time it was created. RequisitePro automatically increases the Revision number as modifications occur.
- Click on a revision from the revisions listbox to view details about that revision.
- Click on the Print button to print the set of revisions for that.
Note: if you need to print simultaneously revisions pertaining to multiple requirements, use Rational SoDA, Rational Document Automation tool, to extract any set of revisions from the RequisitePro repository and print a Word or Frame document. Alternatively, open the read-only RequisitePro database via an ODBC connection and use a off-the shelf report to query revisions on multiple requirements.
2. Perform Impact Analysis
Displaying the history of a requirement is an important step performed during impact analysis. One of the purpose of setting traceability links between requirements is to be able to measure the impact of a requirement change over related requirements.
RequisitePro displays impact of requirement modifications with a suspect link. A suspect link is visually represented in a traceability matrix or a traceability tree with a red slash over a traceability arrow. This indicator visually notifies users that a requirement has changed (its text or one of its attributes) and that there is possible impact on requirements that are traced to or from the modified requirement.
When a suspect link is displayed, a designated person on the project (typically the project manager) will investigate what causes the suspect link and how much impact it may have on other requirements. This designated person will view the history of the two requirements involved in the suspect link, following the steps outlined in the above section on Viewing the History of a Requirement. When viewing the history of the modified requirement, two decisions can be made:
- Either the modification to that requirement has no impact on the linked requirements. In which case, the suspect link can be cleared. To clear a suspect link:
- While in a traceability view, position your cursor on the suspect link icon, right-click to display the context-sensitive menu and select Clear Suspect.
- Or the modification has an impact on the linked requirements. In which case the definition of the linked requirement(s) needs to be updated to reflect the change before the link is cleared.
- While in a traceability view, double click on the requirement that is affected to modify its text.
- If the requirement was created in a RequisitePro document, RequisitePro will open the document and position the cursor on the requirement. Modify the text of the requirement to reflect the impact of the related requirement. Then use Document=>Save to commit your change.
- If the requirement was created directly in the Views, the Requirement dialog will be displayed. Modify the Text field and click OK to commit your change.
3. Tips on Successfully Recording the History of
Requirements
We have listed here some useful tips to the history of requirements:
- Tip 1: Assign usernames to all users
- Tip 2: Do not delete requirements
- Tip 3: Add revisions to traceability relationships
- Tip 4: Always fill in change notification dialogs
Tip 1: Assign usernames to all users
An important part of the history is the author of a requirement change. This author is the user logged into the RequisitePro project at the time the requirement is modified. In order to record which user is logged, you need to turn on the RequisitePro security.
By default RequisitePro projects have security turned off. Even if you do not want to set permissions for each project components (project, documents, requirements, etc), enabling security allows you to assign username to users. These usernames will be entered in the requirement revisions as a user creates or modifies requirement.
To enable security and create usernames, follow these steps:
- From the Tool Palette, select Project=>Security. This displays the Project Security dialog.
- Turn on the "Enable security for this project" checkbox
- (Optionally) Create user groups:
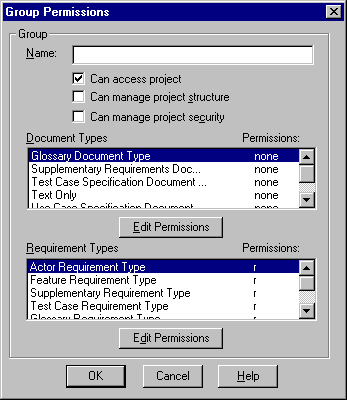
- Click on the Add button located in the Groups groupbox (left side of the dialog). This displays the Group Permissions dialog.
- Enter a group name and define permissions for that group. Permissions can be set at the Document Type level, at the Requirement type level, at the Attribute level, as well as the specific Attribute Value level. You can also define whether this group of users can modify the project structure, such as adding attribute to requirement types, adding document types, etc.
- For each security group, from the Project Security dialog, select the group in the Groups groupbox.
- Click on the Add button located in the "Users of Group" groupbox. This displays the Add User dialog.
- Enter a Username (ex: John Smith).
- Optionally enter a password and email address. Email addresses are used when users participate in email-enabled group discussions.
Tip 2: Do not delete requirements
RequisitePro allows you to delete requirements. This feature is useful when you first create a project and you may experiment on how to use RequisitePro, and what level of granularity you want to record requirements. At some point, you’ll decide that your project is now ready to be maintained. From that point on, you will want to keep track of every modification made in the project. If you delete requirements after that time, you should know that when RequisitePro deletes requirements, every property of that requirement is deleted, including its history, which is typically not information you want to lose. RequisitePro will ask your confirmation before deleting the requirement. Rather than deleting a requirement using the Delete feature, we recommend to follow these steps:
- Create an attribute (ex: Deleted, or Inactive) to mark requirements as "deleted" (or inactive). You can always re-activate that requirement later by simply changing the value of that attribute.
- You might also want to relocate inactive requirements either to the bottom of their document, or to the database (so that inactive requirements don’t appear in documents). To relocate document-based requirements (requirements that were created in a Word document as opposed to directly from the Views), follow these steps:
- In the Word workplace, position your cursor in the requirement text.
- From the Tool Palette, select Requirement=>Cut.
- From the Tool Palette, click on the "Switch to the views workplace" icon to go to the Views workplace.
- Create an attribute view, then select Requirement=>Paste.
Tip 3: Add revisions to traceability relationships
By default, RequisitePro maintain revisions of requirements, not traceability links. To tell RequisitePro to also maintain revisions of traceability links:
- Before starting RequisitePro, open the reqpro.ini file.
- Navigate to the [PREFERENCES] section.
- Set the TraceRevisions to TRUE.
- Restart RequisitePro.
- You will then notice that setting a traceability link, marking a suspect link, and
clearing a suspect link is now recorded in the History dialog.
Tip 4: Always fill in change notification dialogs
When a requirement is modified, a good requirement management process would recommend to record the "why" of that change. RequisitePro provides a Change Description field to record this information.
The Change Description field is located on the General tab of the Requirement dialog.
Also, when saving a RequisitePro document containing requirements that have been modified, RequisitePro will display the Change Notification dialog for each modified requirement. You can use the "Apply to all modified requirements in the document" checkbox to attach the same Change Description information to all modified requirements (ex: "per meeting with VP on 7/3/98").
It is very important to input a meaningful description in that field, so that every requirement modification is fully captured into RequisitePro.
![]()