Figure 1 : Sample QuickReport
| СТАТЬЯ |
15.08.00
|
Dennis P. Butler
Introduction
The design and implementation of reports for an application is typically seen as one of the more mundane tasks associated with development. Who wants to spend large amounts of time formatting, test printing, and working with a variety of reports when there are more exciting tasks that can be done for an application? Although it is not always the favorite part of an application’s development cycle, it is often the most critical interface between the data stored by an application and the beneficiary of the application itself. A multi-tiered, multi-threaded, multi-lingual application running on multiple operating systems on multiple continents is not fulfilling its purpose if the end-user who clicks "Print.." is not satisfied with how the report looks, and ends up throwing the report into the office recycling bin.
One of the problems with report writers is the requirements placed on them by end-users. As anyone who has worked with report-heavy applications can testify, no matter how many different ways a report is formatted, there will always be someone who will ask the inevitable: "Sure it looks great, but what if I wanted to do this…?" Since no report writer can possibly do everything that an end-user could dream up, it is beneficial, even necessary, for both the end-user and the developers of an application to review the reporting requirements and expectations before development. This includes giving a decent amount of time during design to consider which report writer gives the maximum amount of functionality and flexibility based on the complexity and requirements of the reports.
This paper will introduce several options that are available to developers of Delphi and C++Builder for creating reports in their applications. For the purposes of this article, the following report writers will be covered :
- TPrinter : For the "do-it-yourself" type
- QuickReports : The in the box solution
- Ace Reporter : Integrated Report Writers
- ReportPrinter Pro : More of Integrated Report Writers
- Crystal Reports : Stand-alone Report Writers
Since there are so many different report writers available for developers, it is impossible to include all of them in one concise, comprehensive article. The report writers covered in this article compromise a large proportion of what is being used on a daily basis in the Delphi and C++Builder communities at this time. The versions of the report writing tools in this article are relative to the release of this document, and are as up to date as possible. The latest versions of both Delphi (5) and C++Builder (4/5) are used for this document, depending on availability from the vendor.
This paper is intended to not only give an overview of the available report writers and their capabilities, but also to provide a framework for developers to analyze their options so that the correct decision is made the first time when selecting a report writer. After reading this paper, developers should be able to make an informed decision about which tool is best for a particular project.
Categorizing Report Writers (or "What is my first step?")
As noted above, this paper will cover four report writing tools. Each of them is largely distinct in its own way in terms of designing, developing, and distributing the reports with the application. This section will briefly describe each of the tools that will be covered in detail later in the paper.
The TPrinter Object
The TPrinter object is included with all versions of Delphi and C++Builder as a direct interface with the printer device for a computer. It is an object from which the user has granular control over what specifically is drawn on the print canvas, and then sent to the printer. All the user has to do to take advantage of this capability is to include the printers unit in the uses or include section of the unit. Once this has been done, the TPrinter object will be automatically created when the project is run, and the user can make calls to it in code by referencing the function ‘Printer’.
** In prior versions of Delphi/C++Builder, the printers unit had a global variable called ‘Printer’ that could be referenced when the unit was added. Using a function call instead (which returns a TPrinter object) reduces the overhead in applications which have the printers unit declared but not used in the code.
The TPrinter has no distribution issues and does not affect the application in any way. Aside from the memory taken by the object when it is used in code, there are no other considerations to be made.
QuickReport Components
The QuickReport tab on the Delphi or C++Builder component palette contains all the components that provide QuickReports support in an application. This report writer is a suite of native VCL components, so like the TPrinter there are no additional development or installation requirements for their use. To use QuickReports, components are dropped on a form and set up at design or run-time.
-QuickReports : By QUSoft www.qusoft.com
Integrated Report Writers – ReportPrinter Pro, Ace Reporter, ReportBuilder Pro
These three report writers are essentially the same in theory as QuickReports, in that they are suites of native VCL components. Again, there are no additional installation requirements for their use. These tools must be purchased separately from Delphi or C++Builder. The web sites for them are as follows :
-ReportPrinter Pro : By Nevrona Designs www.nevrona.com
-Ace Reporter by SCT Associates www.sct-associates.com
-ReportBuilder Pro : (Formerly Piparti Pro) By Digital Metaphors www.digital-metaphors.com
Stand-alone Report Writers – Seagate Crystal Reports
Stand-alone report writers are not associated natively with the Delphi or C++Builder programming languages. Instead, they are separate products that have a report designer and typically a small macro language with them. These report writers typically have more to offer since they are used by a larger programming community, but they usually require a series of DLL’s and other report files when they are used. Seagate Crystal Reports provides a single component to interface with the report engine in addition to making direct calls to the reporting API.
-Crystal Reports : By Seagate Software www.seagatesoftware.com
-Latest Components : ftp://ftp.img.seagatesoftware.com/pub/seagate_crystal_reports/delphi/
The TPrinter Object : Reporting with Simplicity
The TPrinter object, as mentioned above, is a part of both Delphi and C++Builder as the default way for users to send information directly to the printer. It is an object with several key properties and methods to accomplish this goal. It has a completely nonvisual interface, and requires all functionality to be written in code.
Below is a very simple example of how to use the TPrinter object to send a text message to the printer.
procedure TfrmTPrint.btnSimpleTextClick(Sender: TObject);
begin with Printer do // call Printer function, which returns a TPrinter
begin
BeginDoc; // Begin Current Print Job
Canvas.TextOut(0, 120, edtSimpleText.Text); // Draw On Canvas at position 0,120
EndDoc; // End Current Print Job (Begin Printing)
showmessage('Text sent to printer.');
end;
end;
The C++Builder code is shown below.
void __fastcall TfrmTPrint::btnSimpleTextClick(TObject *Sender)
{
Printer()->BeginDoc();
Printer()->Canvas->TextOut(0, 120, edtSimpleText->Text);
Printer()->EndDoc();
MessageBox(NULL,"Text sent to printer.","Printing Completed", MB_OK);
}
The BeginDoc represents that we are beginning a new page to be sent to the printer. >From here, we make modifications to the TPrinter canvas by using the TextOut function, which specifies the location in pixels and the text that will be placed on the canvas. The call to EndDoc represents the end of the print job, and sends the canvas to the printer. The output will be printed in the default font for the canvas, which can be changed through the Font property of the canvas.
To print more complicated output to the TPrinter, there are several other properties and methods that can be used. There are several standard properties for controlling the output that are standard on report writers, such as number of copies, orientation of the page, title of the print job, current page number, etc. Since control of printing is set at a low level, other simple operations such as creating a new page is left up to the user. For example, if we wanted to print the output from a table and it overflowed to another page, we would need to use code such as the following to ensure that new pages are created as necessary.
procedure TfrmTPrint.btnDBCustomersClick(Sender: TObject);
var
iYPos : integer;
begin
with Printer do
begin
BeginDoc;
iYPos := 150; // Set Y position for text
tblCustomer.Open;
While not tblCustomer.EOF do
begin
// Output all companies in the customer table
Canvas.TextOut(0, iYPos, tblCustomer.FieldByName('Company').AsString);
tblCustomer.Next;
inc(iYPos, 150);
// Check if we have run off of the current page
if iYPos > PageHeight then
begin
iYPos := 150;
NewPage; // Call new page
end;
end;
EndDoc;
showmessage('Customer information sent to printer.');
end;
end;
..and the C++Builder code.
void __fastcall TfrmTPrint::btnDBCustomersClick(TObject *Sender)
{
int iYPos;
Printer()->BeginDoc();
iYPos = 150;
tblCustomer->Open();
while(!tblCustomer->Eof) {
Printer()->Canvas->TextOut(0,
iYPos,
tblCustomer->FieldByName("Company")->AsString);
tblCustomer->Next();
iYPos = iYPos + 150;
if (iYPos > Printer()->PageHeight) {
iYPos = 150;
Printer()->NewPage();
}
}
Printer()->EndDoc();
MessageBox(NULL,"Customer information sent to printer.","Printing Completed", MB_OK);
}
As mentioned earlier, the implementation of the TPrinter class was slightly changed in later versions of Delphi and C++Builder so that the printers unit does not have a global Printer variable for use. This, coupled with the SetPrinter global function, gives the user the ability to have multiple printer variables working independently. This way lets the user set up different printers with different configurations, and makes it easy to switch between them without losing this information while using the same calling code to print. An example of this is shown in the following Delphi code.
procedure TfrmTPrint.btnSwitchPrinterClick(Sender: TObject);
var
newPrinter,
oldPrinter : TPrinter;
bmInput : TBitmap;
begin
// Initialize our secondary printer variable
newPrinter := TPrinter.Create;
newPrinter.Copies := 1;
newPrinter.Orientation := poPortrait;
bmInput := TBitmap.Create;
try
bmInput.LoadFromFile('C:\INPRISE.BMP');
// Initialize our current printer handle to the default printer
// Print two copies, one for mailing to ficticious customer and one for filing
Printer.Copies := 2;
Printer.Orientation := poLandscape;
with Printer do
begin
BeginDoc;
// Put some information on the report
Canvas.Draw((PageWidth - bmInput.Width) div 2, 0, bmInput);
Canvas.TextOut(0, 500, 'This report brought to you by Delphi 4!');
EndDoc;
end;
// Save old Printer settings into oldPrinter, assign new Printer value
// with newPrinter
oldPrinter := SetPrinter(newPrinter);
try
// Select fax printer driver which creates fax file on HD
Printer.PrinterIndex :=
Printer.Printers.IndexOf('Print to Fax on PRINTFAX:');
with Printer do
begin
BeginDoc;
Canvas.TextOut(0, 150, 'REPORT GIVEN TO CUSTOMER '+DateTimeToStr(Now));
EndDoc; // Fax this through the fax printer driver
end;
// Ficticious code here to call fax program to fax the file
// ...
// if FaxWasSentSuccessfully then
begin
SetPrinter(oldPrinter);
// We have switched back to the original print configuration.
// At this point we can switch back at any time to the
// fax print interface by calling SetPrinter again.
with Printer do
begin
BeginDoc;
Canvas.TextOut(0, 150, 'FAX CONFIRMATION REPORT');
// More code here to print results of our fictitious fax
// ....
// original configuration is still set to print two confirmations.
EndDoc;
end;
end;
finally
// Here we free the newPrinter object
// If we had not used SetPrinter to switch back to oldPrinter, we
// would free the oldPrinter object
newPrinter.Free;
end;
finally
bmInput.Free;
end;
showmessage('Printed two reports, faxed report, and printed fax confirmation.');
end;
And the C++Builder code..
//---------------------------------------------------------------------------
void __fastcall TfrmTPrint::btnSwitchPrinterClick(TObject *Sender)
{
TPrinter* newPrinter;
TPrinter* oldPrinter;
Graphics::TBitmap* bmInput;
// Assign new printer object separate from default Printer() function
newPrinter = new TPrinter;
newPrinter->Copies = 1;
newPrinter->Orientation = poLandscape;
// Load some graphics for our output
bmInput = new Graphics::TBitmap;
bmInput->LoadFromFile("C:\\INPRISE.BMP");
// Output the first report
Printer()->Copies = 2;
Printer()->Orientation = poLandscape;
Printer()->BeginDoc();
Printer()->Canvas->Draw(200, 0, bmInput);
Printer()->Canvas->TextOut(0, 500, "This report brought to you by C++Builder 4!");
Printer()->EndDoc();
// Switch to fax printer object, saving original printer object to oldPrinter
oldPrinter = SetPrinter(newPrinter);
Printer()->PrinterIndex = Printer()->Printers->IndexOf("Print to Fax on PRINTFAX:");
Printer()->BeginDoc();
Printer()->Canvas->TextOut(0, 150, "REPORT GIVEN TO CUSTOMER "+DateTimeToStr(Now()));
Printer()->EndDoc();
// Ficticious code here to call fax program to fax the file
// ...
// if (FaxWasSentSuccessfully) then
{
// Switch back to original printer object
SetPrinter(oldPrinter);
Printer()->BeginDoc();
Printer()->Canvas->TextOut(0, 150, "FAX CONFIRMATION REPORT");
// More code here to print results of our fictitious fax
// ....
// original configuration is still set to print two confirmations.
Printer()->EndDoc();
} // ~if (FaxWasSentSucessfully)
// Here we free the newPrinter object
// If we had not used SetPrinter to switch back to oldPrinter, we
// would free the oldPrinter object
newPrinter->Free();
bmInput->Free();
MessageBox(NULL,"Printed two reports, faxed report, and printed fax confirmation.",
"Printing Completed", MB_OK);
}
//---------------------------------------------------------------------------
The SetPrinter global function should not be confused with the SetPrinter method of the TPrinter object, which is an internal method that should not be called directly.
There are several other important properties that should be mentioned about the TPrinter.
Aborted – Shows whether the print job was aborted through the Abort method
Capabilities – Shows the capabilities of the currently selected printer
Fonts – Lists the fonts that are available for the currently selected printer
Handle – Gives the handle for the print object
PageNumber – Gives the current page number for the print job
PrinterIndex – Gives the currently selected printer from the Printers property. If set to –1, then the default printer is selected
Printers – Lists the printers that are currently available for the computer
Printing – Indicates whether the print job is currently being created. This tells if BeginDoc has been called but EndDoc has not yet been called to actually initiate the print job
In summary, the TPrinter object provides a simple yet very flexible reporting solution for users who require absolute control over what is sent to the printer. Although everything that is printed has to be specifically placed on the canvas through code, there are absolutely no limitations for users who desire complete control of their output. For users who are looking to report simple or non-standard output, the TPrinter provides an easy way to send any canvas based output to the printer with report writer functionality included in the object.
QuickReports
The QuickReports component suite has been available for several versions of Delphi and C++ Builder, and is included with its own component tab in the VCL. Aside from the components available in the box, users can also buy an enhanced report suite from QuickReports that has new export features and report types. For the purposes of this article, the standard components will be covered since they are usually the ones that are used by default.
The basic premise of QuickReports is that the user can drop a report layout component (TQuickRep) onto a form, and from there add different quickreport bands and visual quickreport components to design the format of the report. There are many several types of bands that can be used alone or linked together to produce the desired output. There is also a function interface so that the user can perform a variety of calculations or comparisons to produce output for the report. The resulting report can be printed, previewed, or sent to a variety of export formats.
The inherent advantage to using integrated report writers like QuickReports compared to an external report writer like Crystal Reports is that the user has the ability to control at a very granular level how and when certain information is displayed on screen. Since it is all written in object Pascal, the developer has greater access to the printing engine, and thus has many more possibilities for unique or complicated reports. The component based nature of Delphi and C++Builder makes it easy to enhance the features of quickreports and develop custom reporting solutions that a product such as Crystal Reports is unable to provide.
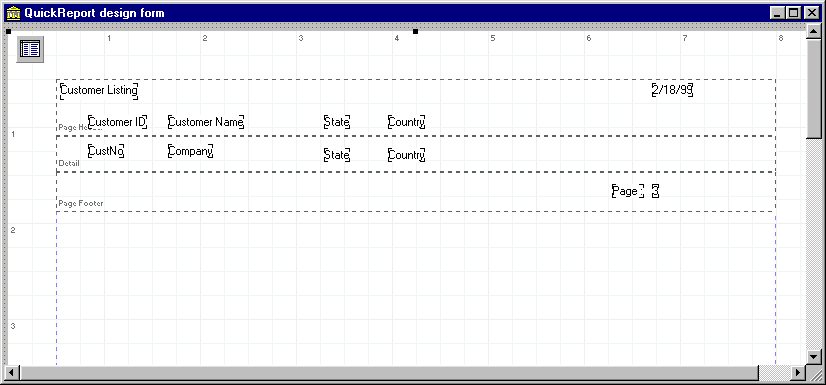
Lets take a look at a simple quickreport, and how we send it to the printer. This report will basically list the contents of the CUSTOMER table in the DBDEMOS alias included in the sample demos installed by Delphi and C++Builder.
Figure 1 : Sample QuickReport
The declaration for this form is declared as the following.
type
TfrmTQReport = class(TForm)
QuickRep1: TQuickRep;
tblCustomer: TTable;
qrbDetailBand: TQRBand;
qrbPageFooter: TQRBand;
qrbHeader: TQRBand;
qrlCustList: TQRLabel;
qrlPage: TQRLabel;
qrlCustId: TQRLabel;
qrlCustName: TQRLabel;
qrlState: TQRLabel;
qrlCountry: TQRLabel;
qrsDate: TQRSysData;
qrsPage: TQRSysData;
qrdCustId: TQRDBText;
qrdCustName: TQRDBText;
qrdState: TQRDBText;
qrdCountry: TQRDBText;
private
{ Private declarations }
public
{ Public declarations }
end;
The C++ Builder header file is shown below. The .cpp file did not have any implementation detail.
//---------------------------------------------------------------------------
#ifndef prntqrH
#define prntqrH
//---------------------------------------------------------------------------
#include <Classes.hpp>
#include <Controls.hpp>
#include <StdCtrls.hpp>
#include <Forms.hpp>
#include <Db.hpp>
#include <DBTables.hpp>
#include <ExtCtrls.hpp>
#include <Qrctrls.hpp>
#include <QuickRpt.hpp>
//---------------------------------------------------------------------------
class TfrmTQuickReport : public TForm
{
__published: // IDE-managed Components
TQuickRep *QuickRep1;
TQRBand *qrbDetailBand;
TQRDBText *qrdCustId;
TQRDBText *qrdCustName;
TQRDBText *qrdState;
TQRDBText *qrdCountry;
TQRBand *qrbPageFooter;
TQRSysData *qrsPage;
TQRLabel *qrlPage;
TQRBand *qrbHeader;
TQRLabel *qrlCustList;
TQRSysData *qrsDate;
TQRLabel *qrlCustId;
TQRLabel *qrlCustName;
TQRLabel *qrlState;
TQRLabel *qrlCountry;
TTable *tblCustomer;
private: // User declarations
public: // User declarations
__fastcall TfrmTQuickReport(TComponent* Owner);
};
//---------------------------------------------------------------------------
extern PACKAGE TfrmTQuickReport *frmTQuickReport;
//---------------------------------------------------------------------------
#endif
All that was done was to drop a TQuickRep onto a form, drop three TQRBand components on the TQuickRep, add a TTable for the source of data, and add various labels, system variables, and database components onto the bands. The TQuickRep was set up to point to the TTable as the dataset, and the database components were also linked to this TTable as well as configured for the fields they point to.
The TQRBands that are put onto the form have a property called BandType to distinguish which type of band it is. For this example, a page header band, a page footer band, and a detail band was used. QuickReports will print a line in the detail section for every record in the dataset of the QuickRep that it is attached to. Individual quickreport database components dropped onto any band can be assigned to a different dataset, which provides the ability to do lookups and links to other tables or queries.
The report itself can be previewed in design mode by right-clicking over the TQuickRep, and selecting "Preview". Note that this preview will not take into account any event code associated with the quickreport components that may have been added. Otherwise, the user can output the report at run-time by calling the TQuickRep Preview, Print, and ExportToFilter methods.
An important note to make here that applies to many integrated report writers is how the reporting process effects the dataset that is being used as a source for the data. When the above report is run, the reporting process will cycle through the TTable, and when it is done the cursor will remain at the last record in the TTable. This is important to note, especially if reports are designed to run off of the same dataset as what is used to display information on screen. Running a report with visual controls in the background will usually show the records being scrolled through, unless of course the developer disables the controls manually. Especially in circumstances where multiple sorting or filtering options are given for a report, when the report is finished the data aware controls on a form may show a much different view of data then before the report was run. It is typically a good idea to separate report dataset components from form dataset components to avoid this type of problem.
For more complicated reports, it may be necessary to provide subtotals or grouping for the output. QuickReports provides several methods to do this. Below is a look at the design for a more complicated report that incorporates page spanning for overlapping fields in a report.
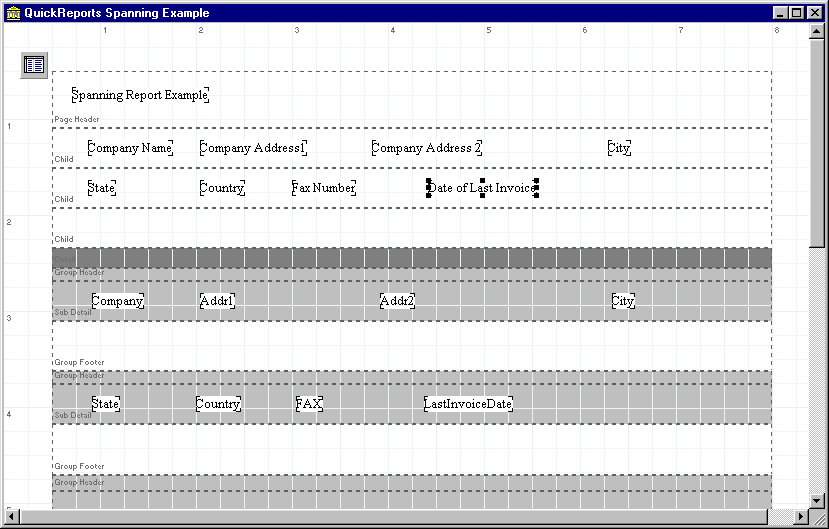
Figure 2 : QuickReport Spanning example
This report shows how child bands and subdetail bands can be used together to provide an alternate output. In this example, the Company Name, Address, and City will be shown as the first group of pages, and the State, Country, Fax, and Date of Last Invoice will be shown as a second group of pages. This is useful in printing reports where there are too many fields to possible fit on one sheet of paper. All that is required is to link the ChildBands together and specify the appropriate grouping band that associates with each child.
SubDetail bands serve to print information that may contain a separate subset of data than the main report itself. In this example the datasets are identical since we are displaying information from the same table, but in other implementation separate datasets could be assigned to separate bands to produce a single report that outputs a variety of different data in series.
QuickReports is native Delphi, and being so it gives the ability to change fields while the report is running to provide alternate views to data. There is an expression component and a designer that is available to create expression based information as well, which will minimize the need to do custom Delphi/C++Builder coding. However, in some situations it is necessary to simply drop a TQRLabel component onto a QuickReport and change the caption of it on the BeforePrint event. This lets the developer create virtually any report output necessary that the expression editor may not provide for.
It is also worth noting that there does exist end-user support for QuickReports, although it is not bundled with QuickReports. QuickReport Artist is a separate product that uses the QuickReports reporting engine combined with an easy to use interface for end-users and developers alike. Although it is off-topic to cover this utility here, it is important to know that additional functionality is available for QuickReports developers.
QuickReports is a good solution for users who wish to produce simple and flexible reports with a minimum amount of effort right out of the box. As the complexity of report increases for a project, the simple design and ease of use of QuickReports tends to diminish. The lack of complete and useful documentation and help files out of the box in Delphi unfortunately makes this report writer frustrating for beginner users who want to take advantage of the more advanced aspects of the product. Although some of the component information can be deduced through trial and error, it is hard for a QuickReports novice to know offhand whether or not the components will be sufficient for a particular business need, or if it is being used in the correct manner. On the positive side, the qusoft web site frequently has downloads, patches, and other files to demonstrate how to use most of the components, but it can be a frustrating process to try and find a more arcane way to approach a report. At the time this article was written, the latest version of QuickReports was version 3.0.6 for Delphi 5, with the same version for C++Builder 5 expected in the near future.
ReportPrinter Pro
ReportPrinter Pro is an interesting combination of the concepts shown in both TPrinter and QuickReports. It’s main functionality is done through the concept of code based reporting; components are used to organize the coding that is done, but in the end the user is defining all report characteristics through Delphi code. This sounds overly complicated at first, but with the interface provided it actually becomes much more of a benefit than a hindrance. RPPro has several components from which the user has events and properties to enter in custom code to be placed on the canvas. As the events are fired, the user can put information onto the print canvas, which is then sent to the printer when the event it completed. In addition to the code based reporting, version 3 of ReportPrinter Pro comes with a visual report designer called Rave, which lets the developer or end user create reports in a visual environment that is comparable to the likes of Crystal Reports and other report writers. This complete code based reporting combined with a visual, flexible band based framework like Crystal Reports or QuickReports provides a total solution for developers who are looking for simple, complex, or completely custom report solutions.
Lets take a look at a simple report that prints the contents of the animals table provided from the DBDEMOS alias that installs with Delphi/C++Builder.
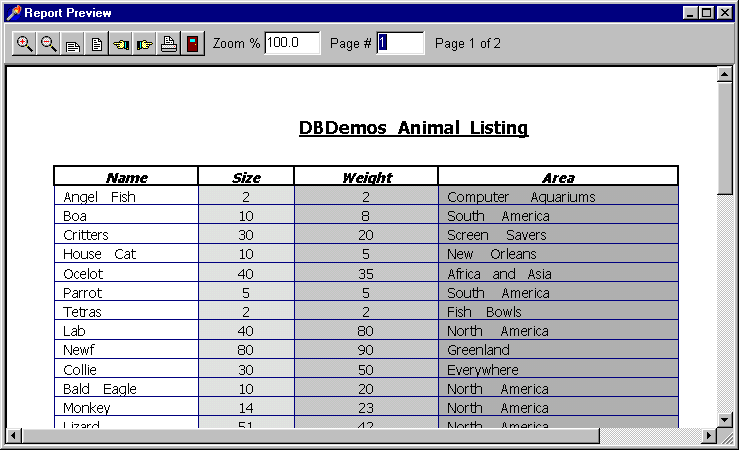
Figure 3 : Report Printer Pro Report
In this report, we create a header area, a footer area, and a grid region that we fill in from a table. To do this, we create our tab layout, and cycle through the table filling in the information. Below is the code that runs this report.
procedure TfrmReportPrintPro.ReportSystem1Print(Sender: TObject);
procedure SetupTabs; // This procedure sets up the column header and tabs
begin
with Sender as TBaseReport do
begin
// Create page settings to begin printing grid and contents
SetFont('Tahoma', 12);
SetTopOfPage;
Home;
// Clear past tab settings
ClearTabs;
// Set color, style, width, etc. for column headers
SetPen(clNavy, psSolid , 1, pmCopy);
// Define width and characteristics for each column
SetTab(0.5, pjCenter, 1.5, 0, BOXLINEALL, 0);
SetTab(NA, pjCenter, 1.0, 0, BOXLINEALL, 0);
SetTab(NA, pjCenter, 1.5, 0, BOXLINEALL, 0);
SetTab(NA, pjCenter, 2.5, 0, BOXLINEALL, 0);
// Draw column headers and text
Bold := True;
Italic := True;
// Set thicker box borders and text for "Name"
Tab(-2, -2, -2, -2, NA);
Print('Name');
// Set thicker box borders and text for "Size"
Tab(NA, -2, -2, -2, NA);
Print('Size');
Tab(NA, NA, -2, -2, NA);
Print('Weight');
Tab(-2, -2, -2, -2, NA);
Println('Area');
Bold := False;
// Set position, alignment, width, margin, outline, and shading% of
// each tab for grid contents
ClearTabs; // Clear settings saved above
SetPen(clNavy, psSolid, 1, pmCopy);
SetTab(0.5, pjLeft, 1.5, 10, BOXLINEALL, 0);
SetTab(NA, pjCenter, 1.0, 10, BOXLINEALL, 10);
SetTab(NA, pjCenter, 1.5, 10, BOXLINEALL, 20);
SetTab(NA, pjLeft, 2.5, 10, BOXLINEALL, 30);
SetFont('Tahoma', 12);
Underline := False;
Bold := False;
end;
end;
begin
With Sender as TBaseReport do
begin
// Set printable section for report body
SectionTop := 1.0;
SectionBottom := 10.5;
SectionLeft := 0.5;
SectionRight := 8.0;
// Call local procedure to set up the tab header and structure
SetupTabs;
// Go through animals table, displaying the information
tblAnimals.First;
While not tblAnimals.EOF do
begin
Print(#9+tblAnimals.FieldByName('Name').AsString);
Print(#9+tblAnimals.FieldByname('Size').AsString);
Print(#9+tblAnimals.FieldByname('Weight').AsString);
Println(#9+tblAnimals.FieldByName('Area').AsString);
tblAnimals.Next;
// Check for end of page
if YPos > SectionBottom then
begin
NewPage;
SetupTabs;
end;
end;
// Clear settings we have changed
ClearTabs;
end;
end;
procedure TfrmReportPrintPro.ReportSystem1PrintFooter(Sender: TObject);
begin
with Sender as TBaseReport do
begin
SectionBottom := 10.75;
// Print footer information
SetFont('Tahoma',8);
PrintFooter('Page ' + IntToStr(CurrentPage),pjLeft);
PrintFooter('Date '+DateTimeToStr(Now),pjRight);
PrintFooter('ReportPrinter Pro 3.0', pjCenter);
end;
end;
procedure TfrmReportPrintPro.ReportSystem1PrintHeader(Sender: TObject);
begin
with Sender as TBaseReport do
begin
// Set printable region above report area
SectionTop := 0.5;
SetFont('Tahoma', 14);
Bold := True;
Underline := True;
PrintHeader('DBDemos Animal Listing', pjCenter);
// Reset printable region
SectionTop := 1.0;
end;
end;
..and here is the C++Builder code.
void TfrmReportPrinterPro::SetupTabs(TObject *Sender) {
TBaseReport* CurrentReport;
// Set up column header and tabs for printing
CurrentReport = dynamic_cast<TBaseReport *>(Sender);
CurrentReport->SetFont("Tahoma", 12);
CurrentReport->SetTopOfPage();
CurrentReport->Home();
// Set tab color to be blue (depending on shading)
CurrentReport->TabColor = clBlue;
// Clear past tab settings
CurrentReport->ClearTabs();
// Set color, style, width, etc. for column headers
CurrentReport->SetPen(clNavy, psSolid , 1, pmCopy);
// Define width and characteristics for each column
// SetTab :
// NewPos : Position of Tab
// NewJustify : Justification
// NewWidth : Width of Tab
// NewMargin : Distance between tab box and text
// NewLines : Defines box layout
// NewShade : Defines shade of box (in percent)
CurrentReport->SetTab(0.5, pjCenter, 1.5, 0, BOXLINEALL, 0);
CurrentReport->SetTab(NA, pjCenter, 1.0, 0, BOXLINEALL, 0);
CurrentReport->SetTab(NA, pjCenter, 1.5, 0, BOXLINEALL, 0);
CurrentReport->SetTab(NA, pjCenter, 2.5, 0, BOXLINEALL, 0);
// Draw column headers and text
CurrentReport->Bold = true;
CurrentReport->Italic = true;
// Tab property - same as calling #9, allows overrides
// Set thicker box borders and text for "Name"
// LeftWidth, RightWidth, TopWidth, BottomWidth : Moves to next tab and draws it
// ShadeOverride : Can override default shading of tab
CurrentReport->Tab(-2, -2, -2, -2, NA);
CurrentReport->Print("Name");
// Set thicker box borders and text or "Size"
CurrentReport->Tab(NA, -2, -2, -2, NA);
CurrentReport->Print("Size");
CurrentReport->Tab(NA, NA, -2, -2, NA);
CurrentReport->Print("Weight");
CurrentReport->Tab(-2, -2, -2, -2, NA);
CurrentReport->Println("Area");
CurrentReport->Bold = false;
// Set position, alignment, width, margin, outline, and shading% of
// each tab for grid contents
CurrentReport->ClearTabs(); // Clear settings saved above
CurrentReport->SetPen(clNavy, psSolid, 1, pmCopy);
CurrentReport->SetTab(0.5, pjLeft, 1.5, 10, BOXLINEALL, 0);
CurrentReport->SetTab(NA, pjCenter, 1.0, 10, BOXLINEALL, 10);
CurrentReport->SetTab(NA, pjCenter, 1.5, 10, BOXLINEALL, 20);
CurrentReport->SetTab(NA, pjLeft, 2.5, 10, BOXLINEALL, 30);
CurrentReport->SetFont("Tahoma", 12);
CurrentReport->Underline = false;
CurrentReport->Bold = false;
}
//---------------------------------------------------------------------------
void __fastcall TfrmReportPrinterPro::ReportSystem1Print(TObject *Sender)
{
TBaseReport* CurrentReport = dynamic_cast<TBaseReport *>(Sender);
// Set printable section for report body
CurrentReport->SectionTop = 1.0;
CurrentReport->SectionBottom = 10.5;
CurrentReport->SectionLeft = 0.5;
CurrentReport->SectionRight = 8.0;
// Call local procedure to set up the tab header and structure
SetupTabs(CurrentReport);
// Go through animals table, displaying the information
tblAnimals->First();
while (!tblAnimals->Eof) {
CurrentReport->Print("\t"+tblAnimals->FieldByName("Name")->AsString);
CurrentReport->Print("\t"+tblAnimals->FieldByName("Size")->AsString);
CurrentReport->Print("\t"+tblAnimals->FieldByName("Weight")->AsString);
CurrentReport->Println("\t"+tblAnimals->FieldByName("Area")->AsString);
tblAnimals->Next();
// Check for end of page
if (CurrentReport->YPos > CurrentReport->SectionBottom) {
CurrentReport->NewPage();
SetupTabs(CurrentReport);
}
}
// Clear settings we have changed
CurrentReport->ClearTabs();
}
//---------------------------------------------------------------------------
void __fastcall TfrmReportPrinterPro::ReportSystem1PrintFooter(TObject *Sender)
{
TBaseReport* CurrentReport = dynamic_cast<TBaseReport *>(Sender);
CurrentReport->SectionBottom = 10.75;
// Print footer information
CurrentReport->SetFont("Tahoma",8);
CurrentReport->PrintFooter("Page " + IntToStr(CurrentReport->CurrentPage),pjLeft);
CurrentReport->PrintFooter("Date "+DateTimeToStr(Now()),pjRight);
CurrentReport->PrintFooter("ReportPrinter Pro 3.0", pjCenter);
}
//---------------------------------------------------------------------------
void __fastcall TfrmReportPrinterPro::ReportSystem1PrintHeader(TObject *Sender)
{
TBaseReport* CurrentReport = dynamic_cast<TBaseReport *>(Sender);
// Set printable region above report area
CurrentReport->SectionTop = 0.5;
CurrentReport->SetFont("Tahoma", 14);
CurrentReport->Bold = true;
CurrentReport->Underline = true;
CurrentReport->PrintHeader("DBDemos Animal Listing", pjCenter);
// Reset printable region
CurrentReport->SectionTop = 1.0;
}
//---------------------------------------------------------------------------
void __fastcall TfrmReportPrinterPro::btnRunReportClick(TObject *Sender)
{
ReportSystem1->Execute();
}
//---------------------------------------------------------------------------
void __fastcall TfrmReportPrinterPro::btnRunRaveClick(TObject *Sender)
{
RaveProject1->Execute();
}
//---------------------------------------------------------------------------
As you can see, we use the TReportSystem component for the interface to the reporting engine. This component is a combination of the original four components that shipped with the first version of ReportPrinter. For this simple example, we have structured the program so that the header information is printed in the OnPrintHeader event, the footer information is printed in the OnPrintFooter event, and the main body of information to be printed is done in the OnPrint event. This can be changed so that all information is printed in the OnPrint event, but by splitting out the events, ReportPrinter Pro lets you logically separate the code. The difference between generating a report this way compared to the likes of QuickReports is that we manually set most of the functionality through code. There are many report-specific properties and methods on the TReportSystem component, but when we get down to the specifics of what is printed, we spell this out in code.
This technique of reporting gives much more flexibility than QuickReports or Crystal Reports by letting the user specify every individual item that is sent to the screen. This is especially helpful for situations where it is necessary to have absolute granular control over what is printed on the screen. This approach allows that flexibility, while not forcing the user to implement the coding overhead of going through the TPrinter.
ReportPrinter Pro has a separate utility used to create reports called RAVE. RAVE is a separate product that is bundled in ReportPrinter Pro, and is intended to be used by developers and end-users alike to create and maintain reports. In this regard, ReportPrinter Pro stands apart from most other report writer tools with the exception of Crystal Reports, which also allows end-users to create and modify reports since it is not a Delphi-specific product. RAVE also allows multiple reports to be combined into a single file or streamed to any data storage location, including a database. This capability is highly useful in giving end-users the ability to access certain subsets of reports and modify them as necessary.
RAVE itself is a report designer, similar in some ways to Crystal Reports. It is launched separately and gives all the standard report capabilities, such as drag and drop fields, controls, lines, and shapes. For Delphi users, it has similar structures such as an object inspector and object tree view so using RAVE as a design tool is also very useful. For the Corporate version of the product, there is no distribution cost so this is a very attractive alternative to products such as Crystal Reports where separate licenses may be necessary when providing end-users with report writing capabilities.
Below is a picture of the basic RAVE report designer showing a simple report.
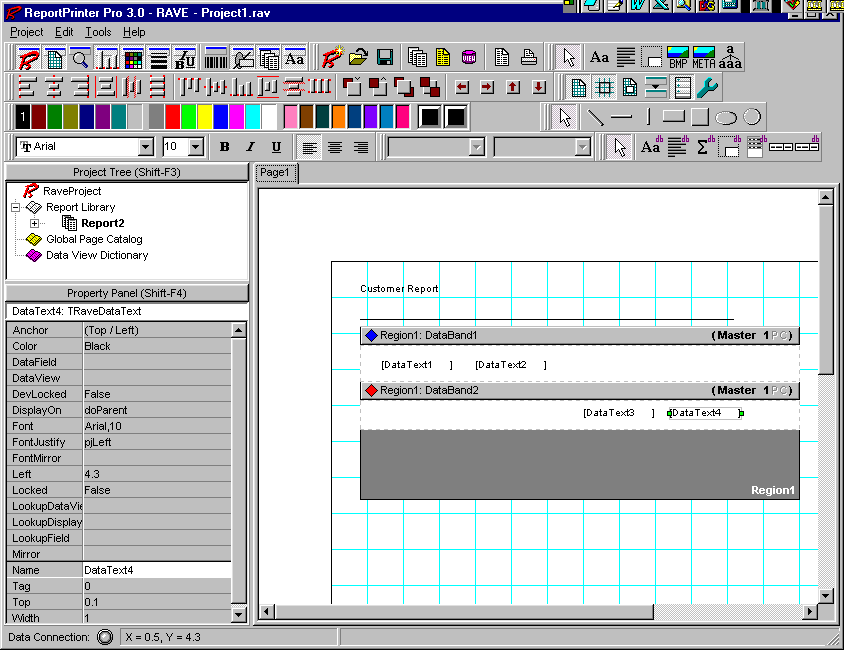
Figure 4 : RAVE interface
The report interface also gives the user the capability to produce reports using wizards, which is a good starting point for beginner users of the product. Advanced users can dig in more detail to create more complicated reports from scratch. There is no code to maintain when using RAVE; a simple component in Delphi (TRaveProject) can be used to connect to RAVE files and gain access to reports saved there. From Delphi, the RAVE file can be loaded from file or stream and executed from applications.
RaveProject1.LoadFromFile(‘C:\CUSTOMER.RAV’);
Or
RaveProject1->LoadFromFile("C:\CUSTOMER.RAV");
In summary, ReportPrinter Pro’s code based reporting combined with the visual designer of RAVE create a powerful utility that can accommodate most any reporting need. The code level reporting, as mentioned earlier, is robust enough to accommodate virtually any reporting need. The RAVE environment utilitizes the familiar band and drag/drop report designer interface that is common among most report writers today. The only drawbacks that could be mentioned about these products is the complexity of them. Code based reporting, although flexible, lends itself to being complicated compared to drag and drop methods such as those employed by Ace Reporter and QuickReports. RAVE, even though it accomplishes this goal, may be overly complicated for some end-users without decent training. Overall, ReportPrinter Pro provides a great solution for simple and complicated reporting needs.
Ace Reporter
Ace Reporter is another all-Delphi band driven report writer. Similar to QuickReports, it has a report layout component that lets the developer drop report controls onto a report layout and define database relationships to get the desired output. Unlike ReportPrinter Pro, it is not based on a code based implementation and has many facilities so that the code required is kept to a minimum. Out of the box, Ace Reporter has many sample reports that can be duplicated by developers to quickly develop reports for most reporting situations. The interface for Ace Reporter is unique among the other report writers that are covered in this paper due to the number of custom design time interfaces that are built into the report designer. This makes organizing and generating reports simpler and takes care of much of the mundane and necessary steps of connecting components and bands that other report writers require.
Much like QuickReports, Ace Reporter is designed to use Delphi/C++Builder database controls for access to data. Because of this, implementations that require either local tables or SQL databases should require no additional overhead in coding. Lets take a look at a simple Ace report to get started.
Figure 5 : Ace Reporter Designer
This is a picture of a simple report at design time that shows customer information from the DBDEMOS alias that is installed with Delphi and C++Builder. This report interface is unique among the Delphi/C++Builder based report writers because of the number of design time capabilities that are given. Like QuickReports, a report template component, TSctReport, is dropped on the form to provide the layout of the report. This component lays out the default report with several default band components already filled in. Also on this template is a series of design-time buttons that provide the interface to add functionality to the report. The only components that get dropped onto the report from the component palette are non-data aware controls. This is a departure from the QuickReport method where everything needs to be dropped on the report template and configured manually. A result of this is that the interface appears much more clean and easy to use; also, the component palette is not littered with countless components that can be confusing as is done with QuickReports.
For the report shown above, all that is required at run-time to launch this report is the following.
AceRptSimple.Run;
Or for C++Builder
AceRptSimple->Run();
This will launch the report with a dialog box for the destination.
The default layout provided gives the developer the capability to change major properties of the report, as we can do with some of the other report writers. Color, font, and miscellaneous settings can be done on a band or control level as is expected. The main functionality for this report template is given through the use of design-time buttons that provide interfaces to the more complicated aspects of creating a report. These buttons are displayed above and are described here now.
The components and bands also provide run-time capabilities for more custom solutions that are required. Using this, developers can produce a range of complicated reports that are more dynamic in content than standard reports.
Now we will examine a more complicated example and take a look at some of
the more advanced features of Ace Reporter.
Figure 6 : Ace Reporter Report
This report shows a master-detail relationship defined within the report. More importantly, behind the scenes, expression variables are being used to determine the number of days an order is later than the last invoice for a customer. In this case a calculated field could have been created in the database to obtain this information, but expressions were used to show their use in a report. Below is the code that drove the expressions.
// The following code is to keep the evDaysPastInvoice variable
// set to the correct value
procedure TfrmAceReporter.evDaysPastInvoiceGetData(oVar: TSctVar);
begin
// Check if the invoice date is less than the ship date
if evCustomerLastInvoice.AsDateTime < evOrderShipDate.AsDateTime then
oVar.AsString :=
IntToStr(Trunc(evOrderShipDate.AsDateTime - evCustomerLastInvoice.AsDateTime))+' days past last invoice.'
else
oVar.AsString := '';
end;
// This shows how other expression variables can be used in computing
// other expression variables, as shown above
procedure TfrmAceReporter.evCustomerLastInvoiceGetData(oVar: TSctVar);
begin
oVar.AsDateTime := tblCustomer.FieldByName('LastInvoiceDate').AsDateTime;
end;
procedure TfrmAceReporter.evOrderShipDateGetData(oVar: TSctVar);
begin
oVar.AsDateTime := tblOrders.FieldByName('ShipDate').AsDateTime;
end;
There are a few items to consider when using Ace Reporter and doing custom coding in Delphi. When Ace database controls are dropped onto bands, variables are created that reference the information that is going to be printed at run-time. This is done because the reporting engine of Ace has its own method for cycling through the data, and during certain events (ie ..BeforePrint or ..AfterPrint) the datasource being used may be in a different location than what would be expected from an event during printing. However, on GetData events, the database will be in the location that it should be so that expression values can be set in their OnGetData events. These variables that are used in Ace are designed to provide the interface to what is being printed, and these variables should be used when doing custom calculations through the Delphi code. For each available field set up, a TSctDBVar component or TSctVarLabel is created. These components can be viewed at design time through the Data Control Center.
The TSctVarLabel also can be used for creating regular or custom labels and output. In these situations the component can be used for most non-data aware information that will be shown on screen. A useful feature of the component is this is that it has many formatting settings on the component itself, so filling floating point information in at run-time that should look like a currency field can be set up on the component instead of through formatting routines in code. This simplifies the process of customizing reports with event code by taking data formatting out of the equation.
Another concept used by the Ace Reporter engine is that of an update level. Each variable has an update level that refers to the section of the report that the variable uses to get the next value it needs to display. This can get tricky if you are doing some behind-the-scenes work on the variables. Basically you just have to be careful to make sure that the variable is going to get updated at the appropriate time based on what manipulations you are trying to perform on it while the report is running. In the above example, the expression variables had their update level set based on when it needed to update their values. So, the evCustomerLastInvoice component has an update level that corresponds to the Customer table band, and the evOrderShipDate component has an update level that corresponds to the Orders table band. The calculated expression component of evDayspastInvoice also has an update level based on the Orders table band because it needs to get refreshed with data for every report line showing information from the Orders table.
One other handy utility that is included with Ace Reporter is an automatic update utility. This is used when converting older versions of Ace to the newer versions. Although moving forward there may not be any code differences between new versions, this utility is in place to take care of any issues that may occur going forward. It will scan the PAS and DFM files for items that need to be changed and update them automatically for the developer. This is very useful, especially compared to the like of Crystal Reports where a new component was developed for version 6.0 that essentially scrapped the entire structure of its predecessor. Such forward-looking features as this should be much appreciated by developers.
At first glance it may seem that the component palette is missing many components that need to be used, or that the capabilities are limited because it does not require as much manual setup like in some of the other report writers. I have found that this method provides a much more organized and structured framework for creating reports, and I appreciate the simplicity that it offers over some of the other report writers. Control is still given at a band and control level, but the implementation and relationships defined are generally handled by the report writer itself. However, there are some considerations to be made when using this. First of all, Ace currently only has the capability to export to RTF. This is a drawback from some of the other report writers which have greater list of export capabilities. Also, an environment such as Crystal provides wizards for many more complicated layouts and formats which greatly simplify the task of trying to create reports. For example, a crosstab report is very straightforward in Crystal Reports, and would require much more work in this environment. To sum up, Ace Reporter is a very solid tool with years of experience in Delphi/C++Builder. Aside from the few issues that have been mentioned earlier, it is a great tool that is easy to learn and implement. At the time this paper was written, the latest version of Ace Reporter for Delphi and C++Builder 5 was version 1.24.
Crystal Reports
Crystal Reports is a mature, stand-alone report writing product that is used by a large proportion of Visual Basic and Delphi developers. This is due in part to the fact that the product is powerful, versatile, and is constantly being updated, revised, and enhanced. This reporting tool uses a visual, band-driven environment coupled with a small programming language and function library to create reports. Reports themselves are saved as Crystal Report files (.RPT extension), and in addition to distributing the reports, a developer must also distribute several DLL’s that constitute the reporting engine for each client machine.
The advantage with Crystal Reports is that you are using a proven, reliable product from a company that has a large user base in several programming communities. This virtually guarantees that support and updates for the product will be there in the future, where the companies that produce "Delphi/C++Builder-only" report writers may not. In addition, Crystal Reports has a variety of exporting options that are easily interfaced through Delphi from the TCrpe component. Theoretically, having a separate product for reporting gives some users the ability to create their own reports from the source of the data for the application, but in most cases this is too complicated for the standard user to accomplish without training.
There are several disadvantages to using Crystal Reports. As mentioned above, several DLL’s have to be distributed to client machines in order for your Delphi/C++Builder application to run the report. Over the years, this has grown substantially to the point that now it is upwards of 8 MB per client. The CRPE32.DLL file (the main reporting engine) has grown from 1.4 MB in the 16 bit environment to 5.3 MB in the latest version. With all of the export DLL’s, database DLL’s, etc. this will quickly take up space in an installation. Also, as new versions come out, the developer must decide whether to upgrade and potentially break reports that were previously working. Since Delphi 1, there have been releases for Crystal Reports for versions 4.0, 4.5, 5.0, 6.0, and 7.0. The recent release of version 8.0 of Crystal has not produced a new version of this VCL component yet, although it will probably be available soon. I have ported applications from 4.0 all the way up to 7.0, and each time there has been issues with doing do. Some of these issues were minor, some were not. Although Seagate is usually quick to resolve issues as they occur and usually have the latest patch available from their web site, there have been many situations where moving to a new version changes formatting of existing reports, changes report features, or removes options that were previously available. These types of issues must be weighed when opting to go with Crystal Reports.
Crystal Reports has been around for many years, with its Delphi roots in the 16 bit development environment of Windows 3.x. In those early days, using Crystal Reports meant that you had to make API calls to the Crystal reporting engine directly to produce and print reports you had created in the environment. Today, users will typically create reports in the Crystal Reports environment, and use the TCrpe component to interface with the report from Delphi/C++Builder. The TCrpe component has also undergone considerable changes over the years, with a complete overhaul done with the release of Crystal 6.0. The component itself specifies which Crystal report file (.RPT) is going to be printed, and lets the user manipulate many data and format related aspects of the report.
Now that we have covered a brief history of Crystal Reports and issues associated with it, lets look at a the Crystal 7 report writer environment. Since the component is unavailable for Crystal 8, the Crystal 7 environment will be used for all examples.

Figure 7 : Crystal Reports Design Environment
This example shows our first example report that has been created. In this report, we have linked the customer.dbf and order.db tables in the Crystal visual linking expert and set up our fields in the bands shown above. In this example, a group band was inserted (select Insert Group from menu) to create a new section whenever the customer name changes. Fields from the table were added to the detail section, and total boxes were added to the group footer for CustomerName as well as the report itself. The report was saved as ‘SIMPLE.RPT’.
A very important difference between Crystal Reports and native Delphi report writers is the method that Crystal interfaces with the data. As mentioned above, most integrated report writers are directly connected with a dataset. Because of this, they must scroll through that dataset for the source of data that is being reported, and thus are limited to the current index for sorting, the current filter for limiting data, and the reporting process may adversely impact visual controls that share the same dataset. Crystal creates its own in-memory internal table that is a composite of all the selected tables and fields of a report, and can limit or sort that table as it is being created. Since this process is not exposed to the user and because this is internal to Crystal, the output can be quickly and easily changed without effecting any data within the application. For example, in QuickReports, the report will output the data depending on the currently selected index for a table, and as a result using group bands without sorting by the group band type may create an unusable report when data for the same customer is shown in different groups. In Crystal, the sorting of the information is done automatically, so setting up a group band on "CustomerName" will sort the data so that all of the data is displayed in the correct location without any additional input from the user. This makes it much easier to create complicated but flexible sorting and grouping reports through crystal reports, since the user does not have to change the index or physical order of the records in a dataset for every sort type.
Now that we have set up our simple report, lets see how to launch this report from our Delphi/C++Builder code in its most simple implementation.
procedure TfrmCrystal7.btnSimpleCrystalClick(Sender: TObject);
begin
with Crpe1 do
begin
// Assumes that report is in same directory as application
ReportName := ExtractFilePath(Application.ExeName)+'\SIMPLE.RPT';
Output := toWindow;
Execute;
end;
end;
All we do is select the report, set the output destination to screen, and execute the report.
There are many different ways to set up a report in the Crystal environment itself, and there are many report wizards included to assist users with this task. Because of the large amount of various reports that can be generated, this paper will focus on getting the most functionality from these reports through the Delphi and C++Builder TCrpe component. A comprehensive review of the Crystal Reports environment itself could be an entire paper by itself, so that will not be accomplished here. It is sufficient to say that there are countless report types that can be created that take into account a large proportion of reporting needs that an application could require.
Now lets examine the TCrpe component it more detail. As mentioned earlier, the TCrpe component was completely overhauled with the release of Crystal 6, giving a much more professional and logical framework than in previous versions of the component. Although this will cause much recoding if users are upgrading from previous versions, going forward developers are given a much more understandable and useful component. The next example demonstrates how to use some of the most commonly used properties of the component. First we will see the screen that calls this code, and then the code itself.
Figure 8 : Sample Crystal Report interface screen in Delphi/C++Builder
This screen gives several options to the user by clicking the "Print With Options" button. This code is shown below.
procedure TfrmCrystal7.btnPrintOptionsClick(Sender: TObject);
begin
Crpe1.ReportName := ExtractFilePath(Application.ExeName)+'\SIMPLE.RPT';
// The following clearing of options is not necessarily required when
// only one report is being run - if you have multiple reports going
// through the same TCrpe component, it is good practice to clear
// first to avoid formula overlap errors
Crpe1.Selection.Formula.Clear; // Clear previous selection criteria
Crpe1.Formulas.Formula.Clear; // Clear previous formulas
Crpe1.Formulas.Clear; // Clear previous formula names
Crpe1.SortFields.Clear; // Ensure sort fields are cleared
// Add selection criteria formula to report (note "and" at end of 1st line)
if cbCustomer.Text <> 'All Customers' then
Crpe1.Selection.Formula.Add('{Customer.Company} = "'+cbCustomer.Text+'" and ');
Crpe1.Selection.Formula.Add('{Orders.OrderNo} > '+IntToStr(seOrderNo.Value));
// Add formulas to report
if edtPrintedBy.Text <> '' then
begin
Crpe1.Formulas.Add('fmlaPrintedBy');
Crpe1.Formulas.Formula.Add('"'+edtPrintedBy.Text+'"');
end;
if edtComment.Text <> '' then
begin
Crpe1.Formulas.Add('fmlaComment');
Crpe1.Formulas.Formula.Add('"'+edtComment.Text+'"');
end;
// Define sort order
Crpe1.SortFields.Add(0);
case rgSort.ItemIndex of
0 : Crpe1.SortFields.Field := '{Orders.OrderNo}';
1 : Crpe1.SortFields.Field := '{Orders.AmountPaid}';
2 : Crpe1.SortFields.Field := '{Orders.ShipVIA}';
end;
if cbSortAscending.Checked then
Crpe1.SortFields.Direction := sdAscending
else
Crpe1.SortFields.Direction := sdDescending;
// Check destination for report
case rgDestination.ItemIndex of
0 : Crpe1.Output := toWindow;
1 : Crpe1.Output := toPrinter;
else // file export options
begin
Crpe1.Output := toExport;
if rgDestination.ItemIndex = 2 then
begin
Crpe1.Export.FileType := Excel5;
dlgSave.FilterIndex := 1;
end
else
begin
Crpe1.Export.FileType := HTML32std;
dlgSave.FilterIndex := 2;
end;
// Get file name
if not dlgSave.Execute then
exit;
// Delete if exists
if FileExists(dlgSave.FileName) then
DeleteFile(dlgSave.FileName);
Crpe1.Export.FileName := dlgSave.FileName;
end;
end;
// Run the report
Crpe1.Execute;
end;
In this example, we see how the following properties work :
Selection – This is used to limit the report based on a value or series of values. This directly corresponds to the "Report", "Edit Selection Formula", "Record" selection from the main menu of the Crystal Report designer. The user can retrieve the current settings in the report from Delphi by calling Crpe1.Selection.Retrieve or Crpe1->Selection->Retrieve() from code, or can go ahead and add new selection criteria on top of what is already in the report. An important design note is that when multiple lines are added to the selection formula from code, operators must be placed between separate criteria or an error will result. This is displayed in the prior example where the "and" is added to the end of the first selection formula.
GroupSelection – Although not specifically shown in the above example, this property works in the same manner as Selection. This property lets the user specify selection criteria for an entire group. For example, this property could be used to limit the report to show only customers with a summary AmountPaid of greater than a certain dollar amount.
Formulas – This is used to access the formula fields of the Crystal Report from Delphi/C++Builder. This is especially powerful because since group sections can be grouped by a formula, this gives the developer the ability to make the grouping type of a report flexible through code.
SortFields – This is used to specify the sort direction for the report. Multiple sorts can be specified, in either ascending or descending order for each.
Output – This is used, in conjunction with the Export property, to select the destination for the report. If the destination is set to toExport, then the Export property must be filled in with certain information. More complicated implementations can use this property to send reports directly to e-mail, Word for Windows, or a variety of other possibilities.
These properties mentioned here are the primary methods to manipulate the data that is displayed on the report itself. The component also has many other properties that change other aspects of the report, such as margins, number of copies, etc. A core understanding of the properties displayed are sufficient to start producing useful, flexible reports with a minimum of effort.
Overall, Crystal Reports 7/8 provides an excellent way for developers to produce professional reports very quickly. The designer interface is easy to use, the component interface to the report engine is now much easier to use than in the past, and the report writing package itself is robust and well supported. Looking for a complete, finished product that both you and your end users can take advantage of? Look no further.
Conclusion
The purpose of this paper was not to simply cover different report writers available for developers that provide a common method for reporting. Each report writer shown above has different target users, developers, and overall goals, and this is reflected in what each one has to offer. There is not, and will never be, one single report writing tool that can be used in all situations.
For a final summary, here are our contestants with their strengths and weaknesses.
TPrinter
J Quick, simple printer interface capability
J Part of Delphi/C++Builder, thus always supported
L Far too simple for complex implementations
QuickReports
J In the box – no additional costs for use
J Visual band driven reporting for quick and easy implementations
J Native Delphi – No additional run-time libraries are required
L Lack of complete documentation makes learning frustrating at times
L Difficult to produce nonstandard reports or output outside of framework given
ReportPrinter Pro
J Visual band driven reporting for quick and easy implementations (RAVE)
J Low level canvas control combined with many functions for creating virtually any type of output
J Native Delphi – No additional run-time libraries are required
L Reporting through code is at very low level, thus many functions and methodology to learn
L Must be purchased separately from Delphi/C++Builder
AceReporter
J Visual band driven reporting for quick and easy implementations
J Native Delphi – No additional run-time libraries are required
J Complete documentation and samples for all report capabilities, newsgroup support
J Handy automatic code conversion utility for changes in new versions of Ace
L Limited export capabilities
L Must be purchased separately from Delphi/C++Builder
Crystal Reports
J Visual band driven reporting for all implementations
J Largest of all report writers covered here, thus more support and larger user base
J Serious tool for power-users as well as developers. Data input types and output are top notch.
L Large distribution cost both in size and in number of files required in distribution
L New versions of product and component often incompatible or altered from prior versions
L Must be purchased separately from Delphi/C++Builder
Based on the need of the application, the appropriate tool should be selected that provides the most functionality with the least cost involved. There are many other reporting tools that were not covered in this paper that may fall into one of these categories, or may overlap some of the strengths or weaknesses of what was shown here. The fact that they were not reviewed in this paper is not any implication that they are not as good or useful a reporting tool as what was covered, but merely that they probably fit into one of the categories that were already demonstrated.
In my opinion, the phrase "It’s a dirty job, but someone’s got to do it" applies very much to reporting. Developers armed with the appropriate reporting tool can make the difference between a successful and unsuccessful application, not to mention the ability to meet deadlines and rapidly develop productive solutions. After reading this paper, developers should have a good idea of what reporting paradigm will best suit their business needs.
Interface Ltd.Отправить E-Mail http://www.interface.ru |
|
По техническим вопросам обращайтесь к вебмастеру Документ опубликован: 15.08.00 |